Welcome To The Hacker Club 4U

On This Blog Now You can get knowledge about how to to do hacking and also Know how to prevent from hacking and know many tips And tricks of computer and internet

Hacking

Click Here To Know Many Tricks and Tips Of HACKING facebook,twitter and other accounts and passwords

Hacking Safety And Security

Click Here to know how to protect your computer and inetrnet from hacking and know hacking safety and security tips and tricks

Facebook And Twitter

Click On Picture For TWITTER And Click On This Tittle For FACEBOOK .Hacking And Security Tips Of facebook and twitter.Know how to byepass facebook login and twitter login

Gmail And Yahoo

Click On Above Picture For GMAIL Hacking And Security Tips . And.Click On This Title For YAHOO Hacking and security tips


How to Log In to Multiple Facebook Accounts

facebook


If you have noticed, you can never open more than one Facebook user
account simultaneously in any browser. One way around this is to use the private browsing feature, but this will only let you open 2 accounts at the same time and fails if you try to open any more.
What if you need to log into more? Well, this article will tell you how to log into many Facebook accounts with a simple script.

Installing the Script

If you are a Chrome user, you can use the script directly, but if you are on some other browser, make sure your browser has the necessary add-ons, like Greases Monkey is required for Firefox, before you proceed.
Once you have everything in place, install the Facebook Switch Accounts script in your browser and restart it.
install
If you login to your Facebook account now, you will see a new section at the top right panel named Switch Accounts. That’s the control panel that allows you to go from one account to the other.
Click on Add Accounts under the Switch Account menu and add all the accounts you work on simultaneously.
menuNow, all you have to do in order to switch accounts is click the Switch account button and select the nickname of the account you want to switch to.
add user
You can also edit and delete the accounts as well. To configure some advanced settings for the plugin, you can click on the Switch Settings and configure them as per your requirement.
switch settings
That’s all there is to it.  Switching between accounts will be extremely easy from now on.

How to Take a Screenshot on a Mac


Given that Mac keyboards do not have the PrintScreen button, Apple newbies may think that there is no way to take a screenshot. However, this could not be farther from the truth. There are many ways to do screen capture on any Mac computer.
Here are 4 ways to take screenshots on a Mac.

1. Use Keyboard Shortcuts

Screenshots can be done using the following shortcuts.
  1. For capturing the whole image on the screen, press command+ shift+ 3 and save it in a file.
  2. For capturing parts of the image present on the screen, press command+shift+4 and save it in a file.
  3. For capturing the whole image and saving it onto the clipboard, make use of command+control+shift+3.
  4. For capturing parts of the image and saving it onto the clipboard, make use of command+control+shift+4.

2. Grab Application

Apart from making use of the keyboard short cuts one can also make use of Grab application which is included with the Mac OS. You can find it located at /applications/utilities/grab.

3. Using a Scripting Command

The screen capture can be done using the scripting command as shown below,
Screencapture ~iw ~/Desktop/ screen.jpg
If you choose to make use of the screencapture option to take screenshots, there are a few limitations you need to know about;
  • Only the PDF format of file storage is available and storage of the file cannot be done in any other file format.
  • Automatic saving of the screenshots is done, and they are located on the desktop.
  • Cursor capture is not available.
  • Resolution of shots captured using screencapture cannot be changed.

4. Professional Software

Professional software like Snapz Pro X and Jing have many more options present in relation to capturing screenshots on a Macintosh Operating System.

Snapz Pro X

This software available for capturing data on the screen and it can be saved both as a screenshot or better a movie. The software also offers built in email facility. The features which make Snapz Pro X the best solution for capturing screenshots on a MAC OS Computer is its ease of operation through a user friendly interface.
There are many functional options available and the steps to be followed are not complex in nature. The screen shots can be stored as .gif, .bmp, .tiff, .jpg, .pdf, .pict or even as Photoshop files. The image compression feature is good and the screenshots can be cropped, dithered, depth can of the image be changed and scaled.

Jing

Jing is great screenshot capture software which can be used in computers making use of the MacOS. All activities on the computer can be captured using Jing software and quick email facilities are available which make the Jing application well suited for business needs also.
Few features specific to Jing which make it the best choice amongst other screenshot software are emphasis can be made on the screenshots, instant sharing via hyperlink placed on clipboard for a screenshot, email and forum posting options available with Jing.
Jing is a great way to capture screenshots and visuals can be added to conversations in a quick efficient manner.

How to Run Linux Commands from Windows Cmd Prompt


We all love to have quite a bit of flexibility with the machines we work on. One such thing I love is to have access to both Windows and Linux on the same system. By this, I do not necessarily mean having both operating systems running on the machine. To experience the charm of Windows on Linux, we may use Wine and similarly, to experience the charm of Linux on Windows we may use a program like Cygwin.
In this article, I will guide you on how to use Linux commands from your Windows command prompt to make you have much more flexibility.

First Things First

In order to make this happen, you need to download and install an interface like Cygwin on your machine. During installation, you will be prompted to enter the root folder. Be careful with your choice, as this becomes your root folder with the Cygwin interface.Before we proceed to the command prompt, you may launch Cygwin and get a feel for it. The interface is shown below.

Integrate Cygwin to the Cmd Prompt

In order to make the command prompt understand Linux commands, we need to port Cygwin to cmd prompt. Navigate to the Cygwin root folder that you had selected during its installation. Go to bin folder and copy the location.Next, open your System Properties dialog box. Go to My Computer, right click and Properties. Go to the advanced tab and find the Environment variables button under it. Hit this button to find a new dialog box appear. This is where you need to configure Cygwin for the command prompt.Select New to create a new environment variable. Give it a name as “CYGWIN” and value as the bin path for the Cygwin root location.After this, select the variable named “Path” and click Edit. Navigate to the end of the variable value and add a new variable as %CYGWIN% after putting a semi colon (;). 
You are now done and ready to use your command prompt with all the Linux commands.

Look into the Command Prompt

Launch your command prompt and try doing “Path”. You should see something like the image below with the addition of the Cygwin path. If not, something went wrong, and you need to check if you accomplished all steps properly.If all is fine, you will be able to use Linux commands. Try a few simple one’s out and later you may use it to the full extent. I tried commands like ls -l, cat, pwd and chmod. All seemed to work fine.

Conclusion

This is an awesome and interesting way to make Linux commands available on Windows. If you are a programmer or like to work with Linux, you will definitely love it. Not only does it bring a new set of commands but also increases the features of your cmd prompt. Moreover, it is better than just using the Cygwin interface alone.

How To Make the Windows Desktop Window Scrollable

Generally, people need multiple windows to be open at the time of work. However, they may find it distracting and confusing to see multiple windows lying one on top of the other. Situations may also surface requirements to arrange windows over the visible portion of the screen.
Though many applications allow real estate management of the screen, they do not provide much of an area to work with. Further, it requires a lot of manual work to minimize and maximize a single window while others sit in the background.
Windows Slider comes in as a solution to all these issues by allowing you to extend your screen infinitely towards the left and right.

What is Windows Slider?

Windows Slider is a desktop management application which extends the desktop width infinitely on both sides. It lets you open any number of windows and applications on the desktop and lets you slide the screen to access them without even worrying about minimizing and maximizing. Follow the link to download and install Windows Slider.

How to Configure?

Once you have installed Windows Slider, you will find it residing in the system tray. Right click on the icon to launch its menu.
Select the Configure option to launch the configuration window. There are basically five checkable options. These help you select the method you want to use for sliding your screen. While the first options are for the mouse interface, the other three are sets of hot keys. The second one comes disabled by default.

How to Slide Desktop?

The easiest option is the “Slide by Mouse” option. To slide the screen left and right, move the mouse pointer to the center of the edge respectively. If you have the “Touch-friendly Sliding” option checked, you will find a scroll appearing at the bottom of the screen. To use this, you must hold the right click and drag/scroll in the desired direction.
For keyboard users, they have a set of hot keys:
  • Ctrl-Alt-Q for left and Ctrl-Alt-W for right
  • Ctrl-Alt-Z for centering on active window
  • Alt-Tab for switching windows
The hot keys combinations are editable by launching the configuration window.

Conclusion

One reason that made me use this application was that I no longer had to worry about minimizing and maximizing windows. I could open as many windows as I liked on my desktop without operlapping. Switching over windows was just a scroll away.
Give it a try and let us know what you think in the comments.

How to Close All Tabs From The Same Website In Firefox and Chrome

Many times while I am working online no matter if I am researching on Wikipedia, browsing Facebook pages or shopping for my next gadget, I often end up opening many pages of the same website. Opening multiple tabs helps my work go faster, but after I am done, I feel like closing all of them at once.
Indeed there are option in browsers like “Close tabs on the right” or “Close all but active,” but none of these solves the exact problem I have. If you are a Firefox or Chrome user, you can install the below mentioned add-ons to get this necessary feature right away.

Firefox Users

TabCloser is a simple add-on for Firefox, which integrates the feature to close all the tabs related to a single domain. If you are browsing through Firefox, download and install the TabCloser add-on and restart your browser.
firefox tab closer
Now, next time you launch Firefox, you will see an added option to the context menu when you right click on any of the active tabs. The option will be to “Close all <x> (hostname) tabs” where (hostname) is the name of the website that’s open and <x> is the no of tabs for the domain.
A dialog box will show up to confirm the action, and once authorized, all your selected tabs will be closed instantly.

Chrome Users

Close all tabs from a site is a nifty extension for Chrome, which adds an option to close the current tab, and all other tabs from the same site. Just download and install the add-on to Chrome and next time you want to complete that task just right click on any open page from the specific domain and select close other tabs from this site.
chrome tab closer
Note: Developer has modified the above add-on to introduce an option to close non-active other tabs from the same site leaving the one with focus.

Conclusion

These add-ons indeed come in very handy when you have to close too many open tabs from a specific website instantly. The only problem I see is that, if all the pages you have opened is from a single domain then the use of these add-on will close the browser all together.

Stardock Gives You a Windows 8 Appbar Experience

If you have a lot of applications and windows open at a time and find it difficult to manage them, navigate through or minimize/maximize, Windows 8 has a perfect solution for you. However, not all of us will get a chance to experience this until Windows 8 is publicly released.
One way to try out some of the Windows 8 features is to use Stardock. It emulates the Windows 8 metro interface and adds in a visual bar of apps onto the side of your screen.

First Things First

Stardock has a beautiful interface and is just perfect to manage tabs of open applications. Apart from this, it allows us to tile lists of application that we frequently use for quick access. Follow the link to download and install Stardock. When you are done and launch the application for the first time, it shows a how to use page.
This is a great summary of the tool. You may scroll the list up/down, scroll pages right/left and more.
By default, the visual bar shows two pages named “apps” and “my tiles”. The former will show all open application and windows while the latter is configurable to add in links to other apps and folders.

How to Use Stardock?

The startup page says a lot. It also shows a list of tips to help you. You may again look at these by right clicking on the appbar. For every open window, the bar will show a preview. You may hit on any one to open or hit the cross to close it. To pull in an app drag and drop it and the page.
There are a couple of right click options. The top of the bar, where the page name resides, will show options to rename, delete or configure the behavior of a page.
A right click on any window preview will provide options to close, minimize or restore the window. The option on recent documents shows the list of documents opened recently.
Doing the same on a tiled application will show a shortcut link, unpin and rename options.
Right clicking on a blank space will let you configure the entire appbar or launch tips and how to use pages.

Configuration and Settings

Stardock Tiles have four basic configurable settings. With pages, you may defer page settings or edit existing profiles. There is a list of appearance settings like colors, icon, caption etc. Then, the size and location option lets you place the bar on any of the four edges and lets you choose the bar size ranging between tiny to extra large.

Conclusion

Stardock is a good app to try if you want to get a preview of the Windows 8 metro interface. In addition to that, it is a solid app management application.

How To Create My Own Web Page Using Html Code

Creating a simple webpage in HTML. Before you start coding, let me assume the following facts,
You know simple html tags like, HTML, BODY, TITLE, HEAD, TABLE, LISTS, etc. and some parameters like, WIDTH, HEIGHT, COLOR, BORDER, CELLSPACING, PADDING, etc.
Lets make a simple HTML page format as below:

To do so, we’ll be using TABLE, H1,H2, FONTS, HYPERLINKS, LISTS, HR etc.
Open up the notepad save it as “webpage.html” (with quotes)
And then create a table with similar format:

Your page will contain Page header, Navgation bar, Footer, Contents part.
To create a table similar to the format above, use the following tags.
<html>
<head>
<title>Page title</title></head>
<table width=”100%” cellpadding=”10″>
<tr width=”100% valign=”top”><h2> PAGE HEADER </h2>
<td width=”20%” valign=”top”>
NAVIGATION BAR
</td>
<td width=”80%” valign=”top”>
CONTENTS PART
</td>
<tr width=”100%” valign=”top”>FOOTER PART</tr>
</html>
Now you have the basic layout ready. The things we need now is to fill the blank tables with appropriate contents.
For example:
<html>
<body>
<table width=”100%” cellpadding=”10″>
<!– page title ->
<tr width=”100% valign=”top”><h2>Page Title</h2>
<!– end of page title ->
<hr>
</tr>
<tr>
<!– Navigation bar ->
<td width=”20%” valign=”top”>
<ul>
<li><a href=”#”>Home</a></li>
<li><a href=”#”>About Us</a></li>
<li><a href=”#”>Feedback</a></li>
<li><a href=”#”>Contact</a></li>
</ul>
</td>
<!– End of Navigation ->
<!– Body Contents ->
<td width=”80%” valign=”top”>
YOUR Contents goes here, type your text, insert hyperlinks, lists, images here to beautify your web page.
</td>
<!– End of contents ->
</tr>
</table>
<!– footer notes ->
<tr width=”100%” valign=”top”><p align=”center”>Copyright Footer note</P></tr>
<!– end of footer notes ->
</body>
</html>
The above code will give output in your browser as we’ve planned to (see the first image). Playing with the tags makes you further clear and adapted to web designing using HTML.

Adding images and other hyperlinks.
After making simple page, you can add images, colored fonts, hyperlinks etc to make it more user friendly.
You can use <a href=”#”> and <img src=”#”/> tags to include hyper links and images.
See the example below(put it under the content body tag):
<a href=”http://www.google.com”>
<img border=”0″ src=”http://www.google.com.np/intl/en_com/images/logo_plain.png”/>
</a>
<h3>is the most popular search engine in this world.</h3>
<br/>
<a href=”http://www.google.com”>Click here</a> to go to Google.com
In the above example, Google’s logo image will be loaded using, <img> tag and that tag is enveloped under <a href> tag which enables the image to be clicked.
Similarly you can envelope text to create hyperlinks.
You can also change the size and font colors by applying the following syntax.
<FONT COLOR=”color_name” size=”size_in_number”>FONT TO BE FORMATED</FONT>

To create lists of texts or navigation,
Example:
<ul>
<li><a href=”#”>Home</a></li>
<li><a href=”#”>About Us</a></li>
<li><a href=”#”>Feedback</a></li>
<li><a href=”#”>Contact</a></li>
</ul>
<ul> tag creates a list block and <li> lists them in proper line break. In above example, we’ve listed the text with hyperlinks.
After tweaking and playing with the tags you may get the good result.
For instance take the sample from below:
<html>
<body>
<table width=”100%” cellpadding=”10″>
<!– page title ->
<tr width=”100% valign=”top”><h2>Page Title</h2>
<!– end of page title ->
<hr>
</tr>
<tr>
<!– Navigation bar ->
<td width=”20%” valign=”top”>
<ul>
<li><a href=”#”>Home</a></li>
<li><a href=”#”>About Us</a></li>
<li><a href=”#”>Feedback</a></li>
<li><a href=”#”>Contact</a></li>
</ul>
</td>
<!– End of Navigation ->
<!– Body Contents ->
<td width=”80%” valign=”top”>
<a href=”http://www.google.com”><img border=”0″ src=”http://www.google.com.np/intl/en_com/images/logo_plain.png”/></a><h3>
is the most popular search engine in this world.</h3>
<br/>
<a href=”http://www.google.com”>Click here</a> to go to <Font color=”green” size=“2”>Google.com</font>
</td>
<!– End of contents ->
</tr>
</table>
<!– footer notes ->
<tr width=”100%” valign=”top”><p align=”center”>Copyright Footer note</P></tr>
<!– end of footer notes ->
</body>
</html>
It will show you the page like this:

Hope this tutorial gave you some basic idea of designing webpage using notepad and HTML.

How To Make Your Own Dynamic Home Page Using PHP

we are going dynamic, i.e. every part of your web page, header, footer, body, menu, etc are going to change dynamically. To do so we are going to load separate html file in a single html page.
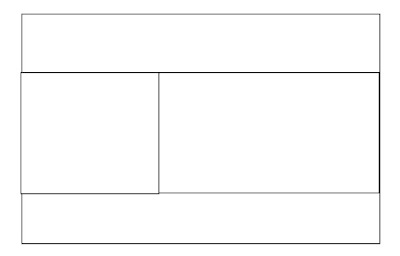
Refer to the chart below for more clarification.


Index.php is the main page which must be loaded by the visitor. Header.html, menu.html, post.html are the Head banner, Menu bar and Posts/articles respectively in separate HTML file. Whilist style.css is the CSS style for all the pages that will be loading in index.php.
Simply we’ll load all the files in index.php.
Let’s start designing the layout for index.php using HTML.
<html>
<head>
<title> Page 1 </title>
</head>
<body>
Header for the web page
<!– Table for Main Body –>
<table border=”0″ width=”100%” cellspacing=”0″ cellpadding=”2″>
<tr>
<td valign=”top” align=”left” width=”90″>
Menu bar at top for page
</td>
<td width=”1″ bgcolor=”lightskyblue” valign=”top”>  </td>
<td valign=”top”>
Main content or article for your home page.
<br> <br>
Same menubar at bottom
</td>
<td width=”1″ bgcolor=”lightskyblue” valign=”top”>   </td>
</tr></table>
</body></html>
I used simple technique of tables to layout the index.php.
Now the layout is ready and we got the maps to assign the specific header, post, menus etc.
Let’s assign the specific file to the specific address.
<html>
<head>
<title> Home Page </title>
<link rel=”stylesheet” href=”style.css”/>
</head>
<body>
<?php
include (“header.html”);
?>

<!– Table for Main Body –>
<table border=”0″ width=”100%” cellspacing=”0″ cellpadding=”2″>
<tr>
<td valign=”top” align=”left” width=”90″>
<?php
include (“menu.html”);
?>

</td>
<td width=”1″ bgcolor=”lightskyblue” valign=”top”>  </td>
<td valign=”top”>
<?php
include (“post.html”);
?>

<br> <br>
<?php
include (“menu.html”);
?>

</td>
<td width=”1″ bgcolor=”lightskyblue” valign=”top”>   </td>
</tr></table>
</body></html>
You can see two differences from the HTML code before and after.
First difference is, <link rel=”stylesheet” type=”text/css” href=”style.css”/> which must lie inside the <head> tag.

What it actually does is, loading the CSS style to index.php.
It’s syntax is:
<link rel=”stylesheet” type=”text/css” href=”#”/>
‘#’ refers to the location of your stylesheet document.
Another is four blocks of code:
<?php
include (“XXX”);
?>

The above code loads the specific html/php or web file wherever it is placed, it is actually a php code that’s why it is enclosed in <?php ….?> or <?….. ?>
We’ve used include (); function to call the specific file, where XXX in the example above refers to the location of the file.
Note: If all the files including sub-files contains in same directory, you don’t need to mention the URL of the file, else you must define the exact location for it.

We’ve basic layout for homepage ready. All we need is the sub-pages.
Design a good banner for your homepage using Photoshop or other Image editing software.
Create new text document with following inputs in it:
<img src=”image/banner.jpg” border=”0”/>
Save it as header.html.
Create another text file with following inputs:
<a href=”index.php”>Home </a> |
<a href=”page2.php”>Page</a> |
<a href=”page3.php”>About us</a> |
<a href=”page4.php”>Contact</a>
Save it as menu.html.
Now create a another text document where your contents will be loaded,
For example,
<h2> H2 heading for the page </h2>
Here goes the main content of your web page. You can include any information about your page here.
Example for a horizontal line = <hr>
Example using ‘class’ = ‘note’:
<span> Example using ‘class’ = ‘note’ </span>
Now let’s put in an image (that is in the same folder as this file so we don’t have to put the full path / URL
<img src=”images/anyimage.jpg” border=”0″ width=”100″ height=”65″ alt=”alternate_text”>
Save the above example as post.html
Now you have all the contents ready. Anything left is the styling part.
You can also create your own style in another text document and save it as filename.css (in this tutorial we’ll call it style.css).
Copy the code and paste it in stye.css that you’ve just created.
body {
background-color: #FFFFFF;
font-family: Arial, Verdana, sans-serif;
font-size: 18px;
}
a { font-family: Arial, Verdana, sans-serif; font-size: 18px; color: #483D8B; text-decoration: underline}
a:hover { font-family: Arial, Verdana, sans-serif; font-size: 18px; color: #000000; background-color: #FAEBD7}
h1 { font-family: Arial, Verdana, sans-serif; font-size: 36px; color: #000000 }
h2 { font-family: Arial, Verdana, sans-serif; font-size: 24px; color: #000000 }
h3 { font-family: Arial, Verdana, sans-serif; font-size: 24px; color: #000000 }
h4 { font-family: Arial, Verdana, sans-serif; font-size: 18px; color: #000000 }
h5 { font-family: Arial, Verdana, sans-serif; font-size: 12px; color: #000000 }
h6 { font-family: Arial, Verdana, sans-serif; font-size: 8px; color: #000000 }
hr{ color:brown; background-color:tan; width:90%; height:2px; }
table { font-family: Arial, Verdana, sans-serif; font-size: 18px; color: #00008B; margin-top: 0px; margin-right: 0px; margin-bottom: 0px; margin-left: 0px; padding-top: 0px; padding-right: 0px; padding-bottom: 0px; padding-left: 0px}
.note { font-family: Arial, Verdana, sans-serif; font-size: 14px; color: purple;
font-weight: bold;}
Save it in style.css.
I’ve applied the styling for only body, horizontal rule(hr), table and custom class named note.
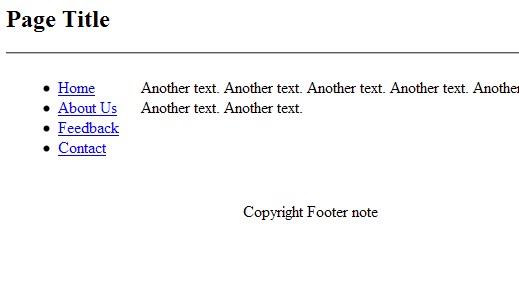
Your final page will have the format similar to below:

You can add and replace the menu.html and other without opening index.php this is what makes your page handling experience some what dynamic.
Hope you liked this tutorial.

Top 10 Ways How Hackers Can Hack Facebook Accounts In 2011

13
Facebook is one of the most widely used social networking site with more than 750 million users, as a reason if which it has become the number 1 target of hackers, I have written a couple of post related to facebook hacking here at THC4U, In my previous post which I wrote in 2010 related to facebook hacking and security 4 ways on How to hack facebook password, I mentioned the top methods which were used by hackers to hack facebook accounts, however lots of things have changed in 2011, Lots of methods have went outdated or have been patched up by facebook and lots of new methods have been introduced, So in this post I will write the top 10 methods how hackers can hack facebook accounts in 2010.


10 Ways How Hackers Can Hack Facebook Accounts In 2011

So here are the top 10 methods which have been the most popular in 2011:


1. Facebook Phishing 


Phishing still is the most popular attack vector used for hacking facebook accounts, There are variety of methods to carry out phishing attack, In a simple phishing attacks a hacker creates a fake login page which exactly looks like the real facebook page and then asks the victim to login into that page, Once the victim logins through the fake page the victims "Email Address" and "Password" is stored in to a text file, The hacker then downloads the text file and get's his hands on the victims credentials.

I have explained the step by step phishing process in my post below:

2. Keylogging 

Keylogging, according to me is the easiest way to hack a facebook password, Keylogging sometimes can be so dangerous that even a person with good knowledge of computers can fall for it. A keylogger is basically a small program which once is installed on victims computer will record every thing which victim types on his/her computer. The logs are then send back to the attacker by either FTP or directly to hackers email address. I have dedicated a half of my newsest book "An introduction to keyloggers, RATS And Malware" to this topic.

Ethical Hacking Book
3. Stealers 


Almost 80% percent people use stored passwords in their browser to access the facebook, This is is quite convenient but can sometimes be extremely dangerous, Stealers are software's specially designed to capture the saved passwords stored in the victims browser, Stealers once FUD can be extremely powerful. If you want to how stealers work and how you can set up your own one?, Kindly refer the book above.


4. Session Hijacking


Session Hijacking can be often very dangerous if you are accessing Facebook on a http:// connection, In a Session Hijacking attack a hacker steals the victims browser cookie which is used to authenticate a user on a website and uses to it to access victims account, Session hijacking is widely used on Lan's. I have already written a three part series on How session hijacking works? and also a separate post on Facebook session hijacking.


5. Sidejacking With Firesheep


Sidejacking attack went common in late 2010, however it's still popular now a days, Firesheep is widely used to carry out sidejacking attacks, Firesheep only works when the attacker and victim is on the same wifi network. A sidejacking attack is basically another name for http session hijacking, but it's more targeted towards wifi users.

To know more about sidejacking attack and firesheep, read the post mentioned below:

6. Mobile Phone Hacking


Millions of Facebook users access Facebook through their mobile phones. In case the hacker can gain access to the victims mobile phone then he can probably gain access to his/her Facebook account. Their are lots of Mobile Spying softwares used to monitor a Cellphone.

The most popular Mobile Phone Spying softwares are:

1. Mobile Spy
2. Spy Phone Gold

7. DNS Spoofing 


If both the victim and attacker are on the same network, an attacker can use a DNS spoofing attack and change the original facebook.com page to his own fake page and hence can get access to victims facebook account.


8. USB Hacking 

Usb password stealer
If an attacker has physical access to your computer, he could just insert a USB programmed with a function to automatically extract saved passwords in the browser, I have also posted related to this attack which you can read by accessing the link below:
9. Man In the Middle Attacks


If the victim and attacker are on the same lan and on a switch based network, A hacker can place himself b/w the client and the server or he could also act as a default gateway and hence capturing all the traffic in between, ARP Poisoning which is the other name for man in the middle attacks is a very broad topic and is beyond the scope of this article, We have written a couple of articles on man in the middle attacks which canb be accessed from the links mentioned below:
If you are really interested in learning how man in the middle attacks, you can view the presentation below by oxid.it.

10. Botnets 


Botnets are not commonly used for hacking facebook accounts, because of it's high setup costs, They are used to carry more advanced attacks, A botnet is basically a collection of compromised computer, The infection process is same as the keylogging, however a botnet gives you, additional options in for carrying out attacks with the compromised computer. Some of the most popular botnets include Spyeye and Zeus.


Facebook Hacking Course
Facebook hacking course is a facebook security course created by me, which tells you exactly how how hackers can compromise your facebook accounts and what can you do to protect your facebook accounts from getting hacked.


Hope you have enjoyed reading the post as much i did while writing.

Note: Copying or reproducing this article is strictly prohibited and will lead to certain consequences, If you are reproducing or copying this article, make sure that you give a proper credit.

Beware! Facebook Scam "Yeahh!! It happens on Live Television!"


we recently covered about a facebook worm which targeted a whole lot of facebook users. It's really sad to see that these types of scams keep growing and facebook hasn't really been able to successfully give protection to their users from such scams.

A new bloke in the list "Yeahh!! It happens on Live Television!", the most viral one yet, is spreading like a wildfire among facebook users.


The following status on one of my friend's wall bought my attention first towards this scam:


Yeahh!! It happens on Live Television![LINK] 
Lol Checkout this video its very embracing moment for her
The lady is the above screen shot is Marika Fruscio an Italian Model, She had Wardrobe malfunction (Accidental exposure of intimate parts) on a live TV show, which is what the scam refers to.

On clicking the link, Facebook users are directed to the folllowing page:


In order to play the video the user has to click the button "jaa", which appears as an age verification system required in order to watch the video. when you click on "jaa" you are infact clicking on a hidden link which consequently post the same link on each of your contact's wall. Next a survey is prompted which the user needs fill in order to watch the video, thus helping the scammers make tons of money.


While searching related to the scam on the internet, I managed to find the source code of the scam on pastebin, This proves that there is not a single body behind this scam, with the source code available in public, any one could create a website and inject the malicious javascript in to it and start scamming.

http://pastebin.com/8y4X2hxj
One more thing to note is that in most such cases blogspot blogs are being targeted as they are free to create, You can create a blog in less than 5 minutes. If this keeps growing, I believe that blogger will stop giving free blogspot blogs and will maybe switch to a payed system or facebook would just disable blogspot domains from being shared, thus making it difficult for real bloggers to market their blogs.

How To Remove The Scam?


It's fairly easy to remove the scam, all you need to do is to report it to facebook.

Beware! New Picture Worm Hits Facebook Today


From last few months, Facebook has been widely targeted for scam and spreading malware, One of the those spreading worm I discovered recently was when I was chatting with my friend, The following message from the sudden appeared.


hehehI!!! lool http://tinyurl.com/Wooo-2841-jpg
From the above screenshot, you can clearly see that tinyurl has been used to shorten the URL, One more thing to note is that it's not an image file as image files end with .JPG extension then -jpg.


The above screenshot describes a more clear picture of what you are going to download along with the JPG file. The exe is basically a Zeus Trojan, Zeus is one of the most popular botnets used for stealing sensitive information such as passwords, credit card numbers. One of it's popular feature is an Anti VM and Anti Sandbox capability, Making it useless for testing it inside virtual environments. 

A scan at Virus total shows that only 3/18 URL scanners were able to detect it as a malware site, Rest of them failed. 


Kindly spread the news by sharing it with your friends and people you know, So they should not fall for the malware.

How do I get rid of a Facebook virus?

die computer die 2.22.07
Facebook viruses have been around for a while, but lately I’ve seen them cropping up even more frequently. You get a Facebook virus when you click on a link that installs malicious code or if you allow an untrusted application access to your account. The links most people click on claim to tell you who has been looking at your Facebook profile (catch those stalkers and ex-boyfriends in the act!) or allow you to watch a video of something “you won’t believe!” or even a video of you (What were you doing here? That’s crazy!). Facebook viruses are becoming harder to discern. This article explains how to fix your Facebook account if you have a Facebook virus.

What Do I Do If I Have a Facebook Virus?

The first thing you have to do when you discover you have a Facebook virus is change your Facebook password. Here’s how:
  1. Log in to your Facebook book account.
  2. Click Account > Account Settings.
    The My Account page appears.
  3. Click the Change link next to Password.
    Three text boxes appear.
  4. Type your current password into the Old Password text box.
  5. Type a new password into the New Password text box.
  6. Re-type the new password into the Confirm Password text box.
  7. Click the Change Password button.
Once you’ve changed your password, write a status update alerting your friends that you clicked on a bad link and had a Facebook virus. Tell your friends not to click on any links that appear to be from you (then refrain from posting any links for a while so people don’t worry about which links are good or bad). If you know specific people received a viral link from you, head over to their Facebook Wall and delete the message from you if you can and let your friend know not to click on the link.
Finally, check to be sure the application isn’t lurking on your account. It’s probably not, but it’s good to be sure and now is a good time to clean out the apps you’re not using any more anyway. To check the apps connected to your account, follow these instructions:
  1. Go to Account > Privacy Settings.
    The Choose Your Privacy Settings page appears. At the bottom of the page is a header called Apps and Websites.
  2. Click the Edit your Settings link under Apps and Websites.
    The Apps, Games, and Websites page comes up.
  3. Click the top Edit Settings button (by Apps You Use).
    The Apps You Use page comes up listing all the apps you’ve allowed to have access to your account.
  4. Go through the list and be sure you know each and every one of the apps.
      If you’re unsure if the app is trusted or if you want to remove an app: 
    1. Click the Edit Settings button next to the app.
    2. Click the Remove App link.
If you don’t see an app that looks like it’s related to the virus, that’s OK. It may not be there. Changing your password is what really matters, this last bit is just insurance.

How Do I Know If a Link Is a Facebook Virus?

With every new current event, you can expect a new rash of viruses. When Osama bin Laden was killed, links surfaced on Facebook suggesting you could watch the raid or see Osama’s dead body. In the last month, a particularly insidious Facebook virus was going around that sent a message claiming someone had tagged or commented on a photo of you. Many times the person who supposedly did the tagging wasn’t someone you knew and many people clicked on the link. Other versions of the virus named the tagger/commenter as one of your friends. Unfortunately, when you click the link, you’re taken to a blank page and most people simply think the link was bad or bogus. In actuality, the link installed a Facebook virus and started sending out bogus links to your friends. If they clicked the links, they got the virus.
One way to avoid getting a dreaded virus is to pay attention. Before you click on a link, consider the source. Is this the type of link this friend usually shares? If not, don’t click. If you’re tempted to click, first hover your mouse over the link and look in the lower left corner of your browser. You’ll see the URL attached to that link. If it’s not a URL you’re familiar with, don’t click the link. If you see .info in the link, I suggest not clicking the link (a link that infected my friend’s account was a .info link).
Do you have more tips? Please leave them in the comments!
Also Read= Easy Method To Make Fake Facebook Virus

Recommend us on Google!

Share

Twitter Delicious Facebook Digg Stumbleupon Favorites More