Welcome To The Hacker Club 4U

On This Blog Now You can get knowledge about how to to do hacking and also Know how to prevent from hacking and know many tips And tricks of computer and internet

Hacking

Click Here To Know Many Tricks and Tips Of HACKING facebook,twitter and other accounts and passwords

Hacking Safety And Security

Click Here to know how to protect your computer and inetrnet from hacking and know hacking safety and security tips and tricks

Facebook And Twitter

Click On Picture For TWITTER And Click On This Tittle For FACEBOOK .Hacking And Security Tips Of facebook and twitter.Know how to byepass facebook login and twitter login

Gmail And Yahoo

Click On Above Picture For GMAIL Hacking And Security Tips . And.Click On This Title For YAHOO Hacking and security tips


Showing posts with label Blogs. Show all posts

How To Protect Images From Being Copied / Downloaded

In this post, I'll discuss some ways to protect images from being copied on the webpages. You spend a lot of time and hard effort to creating unique images for your website, and later other could download them, which is not fair. Do you want to protect your images from being copied? If yes, you are here at the right place. In normal speak, you can not protect your images 100% from being downloaded because a webmaster or any person who knows some coding, may steal your images from your websites. Therefore, if you want 100% protection of your images from being copied, I would suggest you to use your watermark or your name on your images with transparency or don't put it on the internet (joke!). However, you can protect your images from being copied by the persons who are not webmasters.


protect image from being copied or downloaded
Protect Images from being copied or Download

If you Google it "how to protect images from being copied". You'll across with a technique which shared the most on the web by disabled to right click on the WebPages, but I think disabled to right click is not a good idea. Most of the users visit your webpages for information purpose only and very small no. of visitors visit your website for stealing your images so most of peoples feel insulting if you disabled right click on webpages and also it will not give you a professional work. Although, you can disable right click only on the images of your web pages not overall part of your web pages as on the part of your content and your links, but if you disable right click, users may drag and drop images from your webpages to their desktop.
We will discuss some techniques for protect your images from being downloaded as follows,

  1. Protect Images From Being Copied By 'img' Tag.

  2. Protect Images From Being Copied By 'table' tag.

  3. Protect Images Form Being Copied By Disable Right Click Only On Images.


I like the above first and second methods for protection of images in web pages. If you apply first or second method to protect your images from being copied and an image theft comes up on your website, and drag and drop your images to his/her desktop. They will shock and think what it is because they would not get any image to desktop after dragging or after to select the save as option. Let us first in very short description I tell you that what I would try to apply here.

"Firstly, takes an image which would you like to prevent from being copied and note down its width and height, and now create a transparent image of the same width and height as your main image. Now, upload your main image to your post, and then upload your transparent image adjacent to your main image. Now, we will try to move up your transparent image onto the main image. If succeed, everyone can see the main image because the upper layer on the main image is transparent, but if someone drags and drop your images from your web to their desktop, then always your transparent image will move on and your theft shocked each time. That's it!"

Updated: Please read the above message first which is in the quote.

If you want to protect all images on your website, then creating different transparent images for each image is waste of time. Now, we'll create only one transparent image of width and height each 1px, which will save image size too. We will use this transparent image with every image of our websites because we can change our transparent image's width and height via inline style, and all the procedure is same as we mentioned in above quote. Now we start the process.

How To Protect Images From Being Copied / Downloaded By img Tag


If you don't know that how to create the transparent image then simply you can download this transparent image of width 1px and height 1px by clicking on Transparent Image (wait 5 second and click on Skip Ad at the top of the right side). Save this image to the desktop, and upload it into your blog, or you can use free image hosting sites as imageshack.us and grab the direct link to use the image into your blog. You can also host your images into your blogger for free with unlimited bandwidth, to know more about it click on upload high quality images to Blogger.
Now look at the following code.
( Let we use here main image of 200px and height 200px. You may use different size of your image. )

***Here we are using border on the transparent image for better explanation because we could not be able to show you the location of transparent image without borders.
--> Border of Transparent image = Black;

<div style="float: left;">
<img src="https://blogger.googleusercontent.com/img/b/R29vZ2xl/AVvXsEih68peQOY9C_smziNtkxkxWVA_BjGAVDmQNqev9jhJYbEhcWGIWRSJEJLSyviA6euXrUeYwlYdaS_kn3mD64vWO-eQ17t3HVEw2HD_VgkGuPmmign8lMRCLQADuMZi01YWTsu_niK87Iz_/s1600/how+to+protect+images+in+websites.png" style="width: 200px;height: 200px;"/><img src="http://img836.imageshack.us/img836/5371/protection.png" style="border: 1px solid #000; width: 200px; height: 200px; " /></div>
Code 1.0

*** Please read carefully this step: In the above code, we have included two img tags as <img/><img/>. first one is for your main image and second one is for your transparent image, and make sure don't have no space both between both img tags( as <img/>SPACE<img/>) or no enter key ( as <img/>LineBreak<img/> ). Otherwise, these images will not be adjacent and this technique will not work.

*** Make sure in both img tags the height and width must be same or you can increase the width and height of the transparent image section but your main image's height and width must not be less than transparent image size. Otherwise, transparent image could not properly move up on the main image.

*** If you want to add border on main image then simply add the code for adding the border as we created in the transparent image i.e., border: 1px solid #000;

*** You can see in the second img tag we did expand 1x1 px image to 200x200 px image by adding width and height attribute in to the inline style sheet in transparent image.


The Preview of the above code will be as follow,


Now we will try to shift a transparent image hover to the main image by applying margin property on to the  transparent image and also make sure that the layer of your transparent image must be outer than the layer of the main image. It means that we have to use negative margin property on the transparent image. Since, our transparent image is in the right position of the main image. Now, we will try to shift our transparent image from right to left by using negative margin-left property, such as [ margin-left: -(width of main image)px; ], into the inline style sheet of transparent image. Let's adding this attribute into the above code 1.0.

*** Here the width of main image is 200px so we will use margin-left: -200px;
*** If you use the border for your main image then you must be set margin-left: -(width of main image + width of right border of main image + width of left border of main image); , let us we use "border: 1px solid #000;" into the main image, then this border width also includes into the width of main image so 1 px increases by left border and 1px increases due to right border of the main image, so we have to set margin-left: -202px;

so the above code will be changed to,

Code 1.1
<div style="float: left;">
<img src="https://blogger.googleusercontent.com/img/b/R29vZ2xl/AVvXsEih68peQOY9C_smziNtkxkxWVA_BjGAVDmQNqev9jhJYbEhcWGIWRSJEJLSyviA6euXrUeYwlYdaS_kn3mD64vWO-eQ17t3HVEw2HD_VgkGuPmmign8lMRCLQADuMZi01YWTsu_niK87Iz_/s1600/how+to+protect+images+in+websites.png" style="width: 200px;height: 200px;"/><img src="http://img836.imageshack.us/img836/5371/protection.png" style="border: 1px solid #000; width: 200px; height: 200px; margin-left: -200px; " /></div>

let's see the preview,


Sound like good. Your transparent image has completely moved up onto the main image. Can you steal this image? Try it by drag and drop to your desktop or right click on the image and save it to your desktop. What will you get? I think the transparent image only. :)

If you want to add this image to the right side, then simply change"float:left;" to"float: right;" into the above code.

if you want to add this image to the center of your post, then change "float: left;" to "text-align: center;" into the above code. That's it!

*** Where could you paste these codes, please see the instruction of bottom of this post.

*** Basically the position for your images is floated, so if your image is in float left, then your content will be in the right side, the exact example is on the above image (image in left and content in right). In this case you have to need some space between your content and image so replace the following code <div style="float: left;">  in Code 1.1  by <div style="float: left; margin:5px;"> .

*** If you don't wish to write adjacent to the right or left image, then simply add the following code just after the Code 1.1
<div style="clear:both;"></div>

You done!

How To Protect Images From Being Downloaded / Copied By Table Tag


Now, here we will protect images from being copied by using table tag, and make sure to note down the width and height of the main image it's property. I will suggest you to use the above first method for protecting your images. Since, it is also a possible solution for protecting your images from being downloaded so I am also considering this case. If you have a little knowledge about HTML table tag, then you could easily understand what I want to explain so let's with a very short description take a look at this method.
"Firstly, we will create a table and in that table, we will create a row, and then in that row we will create a column (now the game start!). In that column, we will upload my main image as a background image, and then we will insert a value in that column as my transparent image, which will cover the background image and ... and what? End the process. That's it!"
Now look at the follow code,

*** Now, we will not use the border of transparent image. I think you will have familiar with.
*** Since, here we will show the transparent image to its original background, so don't need to margin or padding here.
*** Here, my main image width=249px and height=200px, so we will make the same size of transparent image.

Code 2.1

<table>
<tr>
<td style=" background: url(https://blogger.googleusercontent.com/img/b/R29vZ2xl/AVvXsEih68peQOY9C_smziNtkxkxWVA_BjGAVDmQNqev9jhJYbEhcWGIWRSJEJLSyviA6euXrUeYwlYdaS_kn3mD64vWO-eQ17t3HVEw2HD_VgkGuPmmign8lMRCLQADuMZi01YWTsu_niK87Iz_/s1600/how+to+protect+images+in+websites.png) no-repeat;"><img src="http://img836.imageshack.us/img836/5371/protection.png" style="height: 220px; width: 249px;"/>
</td>
</tr>
</table>

Below is the preview of the above code,
*** Please make sure, there must not be any space between <td><img/> tag.


***Now, let's about the positions of your images into your post, such as left, right or center including the adjacent content to your images or not. We have created a simple table for your need. Take a look,
Want\Do Position What have you to
replace in Code 2.1
from which have
you to replace
Image with adjacent
content
Left <table> <table style="float: left;">
Right <table> <table style="float: right;">
Image without adjacent
content
Left <table> <table style="text-align: left;">
Right <table> <table style="text-align: right;">
Image Center <table> <table style="margin-left:auto; margin-right:auto;">

You done!

Now the third method that is how to protect images from being copied by disable right click only on images on your web pages. We will create a new post for it, because this post has already been lengthy. The second factor is that I am in very sleepy mood, and the light rays of the sun are knocking my door ( LOL).

Where can you paste these codes:

You can paste these codes to anywhere, where HTML allowed. Check out the following steps,

  • In Blogger Post: Sign in to Your Blogger Dashboard -->click on How to protect images from being downloaded Create new post --> select HTML mode and paste the above code.
  • In Blogger Sidebars: Go to Blogger Dashboard --> Layout(Under more options) --> Add a Gadget(choose from sidebars) --> HTML/Javascript(Choose under pop up window) and paste your code and click on Save.

Hope! You enjoy this tutorial and if you have any doubt, then can feel free to ask me via comments.

IF THIS TRICK IS HELPFUL FOR YOU THAN
PLEASE DON'T FORGET TO CLICK ON SUBSCRIBE BUTTON.........!

Top 25 Websites in terms of Traffic

  • 1

    Google.com

    google.com
    World's best search engine

  • 2

    Facebook

    facebook.com
    A social utility that connects people, to keep up with friends, upload photos, share links and ... Morevideos.

  • 3

    YouTube

    youtube.com
    YouTube is a way to get your videos to the people who matter to you. Upload, tag and share your... More videos worldwide!

  • 4

    Yahoo!

    yahoo.com
    A major internet portal and service provider offering search results, customizable content, cha... Moretrooms, free e-mail, clubs, and pager.

  • 5

    Baidu.com

    baidu.com
    The leading Chinese language search engine, provides "simple and reliable" search exp... Moreerience, strong in Chinese language and multi-media content including MP3 music and movies, the first to offer WAP and PDA-based mobile search in China.

  • 6

    Wikipedia

    wikipedia.org
    A free encyclopedia built collaboratively using wiki software. (Creative Commons Attribution-Sh... MoreareAlike License).

  • 7

    Blogspot.com

    blogspot.com

  • 8

    Windows Live

    live.com
    Search engine from Microsoft.

  • 9

    Twitter

    twitter.com
    Social networking and microblogging service utilising instant messaging, SMS or a web interface..

  • 10

    Amazon.com

    amazon.com
    Amazon.com seeks to be Earth's most customer-centric company, where customers can find and disc... Moreover anything they might want to buy online, and endeavors to offer its customers the lowest possible prices. Site has numerous personalization features and services including one-click buying, extensive customer and editorial product reviews, gift registries, gift certificates, wish lists, restaurant and movie listings, travel, and photo processing.
  • 11

    QQ.COM

    qq.com
    China's largest and most used Internet service portal owned by Tencent, Inc founded in Nov... Moreember, 1998. Presently, Tencent is aiming its operations at the strategic goal of providing users with a "one-stop online life service". Tencent's Internet platforms QQ, QQ.com, QQ Games, and PaiPai.com have brought together China's largest Internet community. Tencent's communications and information-sharing services include QQ.com, QQ Instant Messenger, QQ Mail, and search engine SOSO. Linked up with heavily used features such as forums, chat rooms, and QQ Groups, Tencent's Qzone has grown into China's largest personal Internet space. These services foster group interaction and resource sharing. Virtual products such as QQ Show, QQ Pet, QQ Game, and QQ Music/Radio/Live have been successful in providing entertainment and customization options to users. Mobile phone users can take advantage of a number of value-added wireless services. Tencent's PaiPai.com is a C2C on-line shopping platform that seamlessly integrates into Tencent's other community platforms.As of June 30th, 2009, the number of registered QQ Instant Messenger users has reached 990.0 million. Active users numbered at 448.0 million. Peak concurrent users have reached 61.30 million. QQ Games platform counted about 6.2 million users simultaneously on-line. QQ.com has become China's most visited Internet portal website. PaiPai.com has also become China's second largest Internet shopping platform.

  • 12

    淘宝网

    taobao.com
    包括电脑通讯、数码、男装、女装、童装、化妆品、书籍音像、运动用品、游戏装备等各种商品的买卖,还有相关的社区交流,同时提供支付宝网上交易安全保证系统。... More

  • 13

    MSN

    msn.com
    Portal for shopping, news and money, e-mail, search, and chat.

  • 14

    LinkedIn

    linkedin.com
    A networking tool to find connections to recommended job candidates, industry experts and busin... Moreess partners. Allows registered users to maintain a list of contact details of people they know and trust in business.

  • 15

    Yahoo! Japan

    yahoo.co.jp
    Japanese version of popular portal site.

  • 16

    Google India

    google.co.in
    Indian version of this popular search engine. Search the whole web or only webpages from India.... More Interfaces offered in English, Hindi, Bengali, Telugu, Marathi and Tamil.

  • 17

    新浪新闻中心

    sina.com.cn
    包括即日的国内外不同类型的新闻与评论,人物专题,图库。

  • 18

    WordPress.com

    wordpress.com
    Free blogs managed by the developers of the WordPress software. Includes custom design template... Mores, integrated statistics, automatic spam protection and other features.

  • 19

    Google

    google.de
    Suche im gesamten Web, in deutschsprachigen sowie in deutschen Sites. Zusätzlich kann gezielt n... Moreach Bildern, Videos und News gesucht werden.

  • 20

    eBay

    ebay.com
    International person to person auction site, with products sorted into categories.

  • 21

    Google谷歌

    google.com.hk
    谷歌搜索在中国的官方网站。

  • 22

    Яндекс

    yandex.ru
    Поиск информации в интернете с учетом русской морфологии, возможность регионального уточнения. ... MoreПараллельный поиск по новостям, картинкам, товарам, блогам, адресам организаций.

  • 23

    Google UK

    google.co.uk
    The local version of this pre-eminent search engine, offering UK-specific pages as well as worl... Mored results.

  • 24

    Google 日本

    google.co.jp
    多言語対応サーチエンジンの日本版。ウェブ、イメージおよびニュース検索、Usenet掲示板。
  • 25

    Google France

    google.fr
    Version française du moteur de recherche. Propose des outils et des services pour les internaut.

Upload Files To Bloggers

There are many inquiries regarding the types and sizes of files which you can upload to Blogger. There are some limits and I have tried to list all here......


TYPES OF FILES


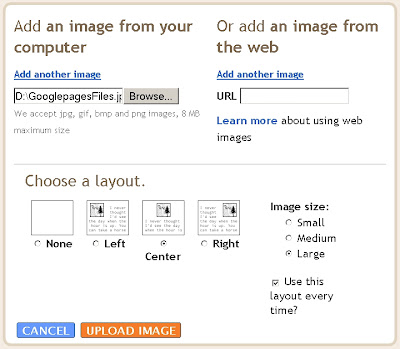
You can only upload image files to your Blogger blog. These can only be uploaded through your blog posts. To do this Login to Dashboard and click on "+New Post". The Post Editor will open. In the top frame of the Post Editor just mouseover all the icons. This will show the tooltips and click on the square bluish icon (Add Image). The upload Image dialog box opens. Click Browse under Add an image from your computer to choose the picture file on your PC. Click on file to highlight it and then click Open. You can also add an image from the web. Paste the URL of your image in the URL text box under "Or add an image from the web". Then choose the position you want the image to be in and the size of the image and click Upload. See Picture below


Click on picture to enlarge it.

SIZE OF FILES


There is a total limit of 300MB on the pictures you are uploading through Blogger, Picasa, or Hello to a free BlogSpot blog. If it is a ftp blog then it is space on your server you should take into account. If you are posting pictures through Blogger Mobile there is a limit of 250K per picture. However there is no way to know whether this limit is approached until you break through it.

Individual pages of your blog are limited to 1MB size. Your main page may run into this limit so limit the number of posts on main page by going to Settings----->Formatting----->Show 4 posts on Main Page----->Save Settings. This will also speed up the loading of your blog.

There is no limit to number of blogs you have or number of posts you can make. Also there is no limit to number of comments. Individual posts do not have limit but may be limited by page-size as described above.


FREE HOSTING


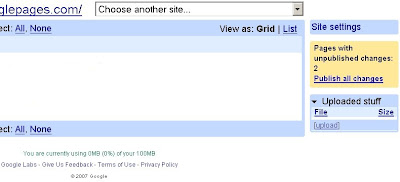
To overcome the size and file-type limit in your free blog try uploading your pictures to a freehostlike Googlepages. You can create 5 sites in Googlepages with each site having free 100 MB space to host files. To upload create a Googlespace account and click on Upload in bottom frame of sidebar. See picture below :


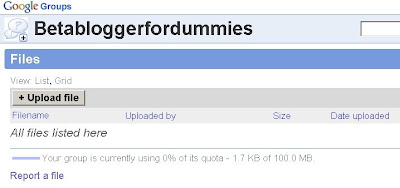
If you cannot create a Googlepages account create a Google Group of your own. You can upload 100 MB of total files here also. Click on "Files" after clicking on Manage Group. Then click on Upload File button. See Picture below:


Thus you can upload image, PDF, MP3, WAV, DOC, TXT and any other files to these freehosts. You can also upload image files to other freehosts like Flickr, Photobucket, Imagehosting etc. To upload files to Flickr see Youtube and Flickr. After uploading the files place your mouse cursor over the filename and right-click and choose Copy Link Location. This copies the location/URL/link of your file at the freehost. Then paste it into this code in your blog :

<a href="LINK OF YOUR FILE AT FREE HOST">DOWNLOAD FILE</a>

When viewers click on "DOWNLOAD FILE" they will get a dialog box prompting the to download your file. In this manner you can also create an image link as described in Making Image Link.

How To Create Fake Pages


I will give some hacking lessons to budding hackers. This will tell you how to create fake pages. Here is how you create one. Let me show how you do for Google.com.

  • Open Google in a new tab or Click Here .
  • Now select "View" from menubar
  • Then select "Source"(IE) or "Page Source"(firefox).
  • This will show you raw html of the site in a notepad in case of IE. In firefox this will be visible in firefox.
  • Now You need To save this page.
  • Just select "Save page as " . Change save type as to "All Files". and save it as XYZ.html(anyname.html)
  • Now just double click on the html it will open in your browser. You will be get the exact replica of the google page
Only problem is the images are not visible. This is because most sites uses relative path. Just visit the actual page and save all images. Now upload it anywhere on the web. Just get the links of the images. In many cases even the css file(for how sites appear) are also relatve. You need to download them too (just type http:/ /_______._/__.css in the browser and the fill will be downloaded)
Go to the html file and Right click on it and select "OPEN WITH" notepad. Now If you know html job's done in a minute else it will have to use trial and error method.
Relative Path is one thing like this "/images/google.gif" you need to give the complete path names where ever possible like "www.google.com/images/google.gif". In case of images you may even replace these with your links.
Tip for those who dont know html : Html consists of tages image is represented as follows "< img. src="actual image link" /> Click here for Html Tutorials
Similarly change all relative path to actual path and the job done.
Now incase you are planning to use is for wrong purpose the replace path(link/URL) to any thing you want. If you are a hacker or Html programmer then you all ready know about this. But if are newbie to either hacking or html then this is a good exercises. Html programers use This frequently for getting source codes of websites but if use this for hacking you could land behind bar then dont say didn't warn you.

Want More Blog Traffic! Submit Your New Blog Here For Free


When your blog is new the only thing you want is traffic and the most easy, simple, best and successful methods are here mentioned below:
  • Leave a comment at the bottom of this post with your blog’s URL and describe your blog in a short paragraph.
  • Subscribe to my RSS feed (In return, I will help you to boost your traffic).
  • Subscribe to the other blogs’ RSS feeds.
  • Make sure you subscribe to the comments so that you get alerted on every new comment.
  • Do not post as Anonymous user, it will be considered as SPAMMING.
  • Every time a new comment is added, go and visit that blog! Do for others as you would have them do for you.
  • Stumble few posts from your blog.
  • Digg few posts from your blog.
  • Delicious few posts from your blog.
  • Write a post on your own blog about the new blogs you have found and link to them.
  • Write a post on your own blog, link to this post so others can participate and write about the new blogs you have found. Link to them.
Your Participation is must for this to Succeed

If you just submit your link and that all ... then et me clear you that nothing gonna happen.
Spend time visiting the other blogs, commenting and subscribing to their feeds. You will also get some traffic from my readers who have already been blogging for a while.

The more you give, the more you get.

I’d like to encourage my regular readers to spread the link to this post around: This is one of those the-more-the-merrier kinds of things. So please Share this post on Facebook, twitter, myspace, stumble, and bookmark at Delicious

NOTE: My comments are moderated. The following will be deleted or marked as spam
  • Automated blogs or splogs
  • Adult content blogs
  • Content about illegal activities
  • Hate speech
  • Anything that seems suspicious to me

How To Add Music To Your Blog Or Website

Hii! This is Pc Hackers Guru Know Many about Hacking

How to add Facebook video to your blog!

How to add Facebook video to your blog!


Most of the bloggers are wondering how people shares Facebook videos with there own blog/website. Even I was having the same question. This time I found the way. Most probably, after seeing this article, Facebook may alter this. Im just giving this information to the web masters as well as to Facebook. 

Follow the steps!..
1) Go to Facebook and select whatever video you need.
.
2) Click on the "Link" or "Video" whatever appears..

3) It might have taken you to a page like this..


4) Copy the Code as I have mention in the image (numbers only) and paste it somewhere u can copy back or   just make sure thats the code you have to copy and thats the one related to video so you can keep the window as its is. follow me!


5) Now copy the following code and paste wherever you want the video to be appeared.

<object height="475" width="600"><param name="allowfullscreen" value="true" />

<param name="allowscriptaccess" value="always" />

<param name="movie" value="http://www.facebook.com/v/
****5326****" />

<embed src="http://www.facebook.com/v/
****5326****" type="application/x-shockwave-flash" allowscriptaccess="always" allowfullscreen="true" width="600" height="475"></embed></object></div>

6) Just replace the number part I have mentioned in Blue color with the Code which you copied from Facebook video. (if you have not copied yet, you can copy and replace the code.)

7) Thats it desired video in your post. enjoy..

Note: please paste the codes in Edit HTML mode. not Compose mode

Warning: I have just given the idea and im not responsible for any damage or loss occures from this issues and im just showing this for educational purpose only. Any legal issues! thats your responsibility.


Nothing Else to Do..

How to make your blog attractive to web traffic

be attracting the adequate volume of web traffic. You need to generate substantial web traffic in order to increase your chances of making a sale or getting good advertising revenue. Irrespective of the purpose of your blog, it is necessary to make it attractive for the visitors to be able achieve a loyalty base.

Search engine optimization is one approach that can be utilized to make your blog more attractive. It involves the use of keywords and phrases. The idea behind the keyword utilization lies in the fact that it will help you get high page rankings on the search engine.
The fact that not many people will even go as far as the second page of the search results, it is important to be listed on the first page to be able to capture a good number of web traffic.
When determining the most appropriate keywords for your blog, it is essential to do an extensive research on selecting the right keywords that represent your niche well. It is advisable to avoid keywords with high competition, because in case you select them you will be competing with a large number of well established sites and this will only make the goal of ranking extremely difficult and very expensive.
The content that you write on your blog should be something meaningful. If you fill your blog with low quality content, the visitors will get turned off and they will not hesitate to press the back key and move away from your blog. It is important to stress that the first few seconds are very critical to be able to capture the hearts and minds of your visitors. Your aim as a blogger is to increase the web traffic that will stay longer on your blog and visit more than a page.
 The selection of the keywords is critical to the success of your blog. The keywords should reflect what your blog is offering. You cannot use keywords on diet, and when your visitors finally end up visiting your blog, they are faced with content on cars.
When you select the keywords, you are making a promise to your potential web traffic that you will deliver what they are looking for. In is important to live up to your promise. Do not make empty promises as this will be a direct turn off to your visitors. Avoid at any cost negative comments about your blog.
Always remember that your ultimate purpose is to get high page rankings in the search engine through the use of your keyword. The keyword has to be reflected in the content of the blog.  
It is worth noting that a long title will not really provide high page rankings, the title should be eye catching and interesting.
Another approach of making the blog increasingly attractive is by acquiring simple links. This can be achieved by going through other blogs that are in your niche and leaving meaningful comments. Avoid spamming and writing unrelated comments, this will lead to your comments to get deleted, and only get you and your blog a bad reputation.
Ensure that you do not overuse the keyword in the content as this may break the flow of the information provided. Read through the content to eliminate any kind of grammatical errors as visitors can easily be put off by such things. Follow the above and you will start noticing a good improvement of the number of web traffic visiting your blog.

How to Add Google Adsense to Blog Header


1. Log in to your blogger account  >> Design >>Edit HTML

2. Put check mark to "Expand Widgets Template"

3. Find this code, by using Ctrl+F
                                                    <div class='region-inner header-inner'>

4.you will find this code.
                    <div id='header-wrapper'>
                  <b:section class='header'

         id='header' maxwidgets='1' showaddelement='no'> 

5. Replace the read value like this

                    <div id='header-wrapper'>
                  <b:section class='header' 

        id='header' maxwidgets='3' showaddelement='yes'> 

6. Click Preview and click save template. 

7. After go to Page Element  in Design tab

8.Click Add Gadget and select Adsense

9. Choose type you want.for example choose  new linked 728x15 ad unit from the drop down
    format menu for an Adsense ad that would sit above the blog title.and configure color.

10. Click save and view blog

Add Animated Fancy Navigation Menu with Jquery to Blogger / Blogspot

Animated Fancy Navigation Menu with Jquery for Blogger. Every One has trying to add a beautiful menu with animation effect by jquery to their Blogger Blogs. But it has very difficult to add a menu to blogger blogs. here is hackerclub has make it as simple and is like 1, 2, 3...
This menu is designed by Sohtanaka

Features:-
1. Simple and Easy to Installation
2. Nice Animation Effect and awesome look
3. Easy to add Links and use.

Watch Live Demo:-

  • BloggerBlogger
  • HarishHarish
  • Blogger Widgets Blogger Widgets

How to Install?
1. Go to Blogger Dashboard > Design tab.
2. Click on Add a Gadget any where in your Layout.
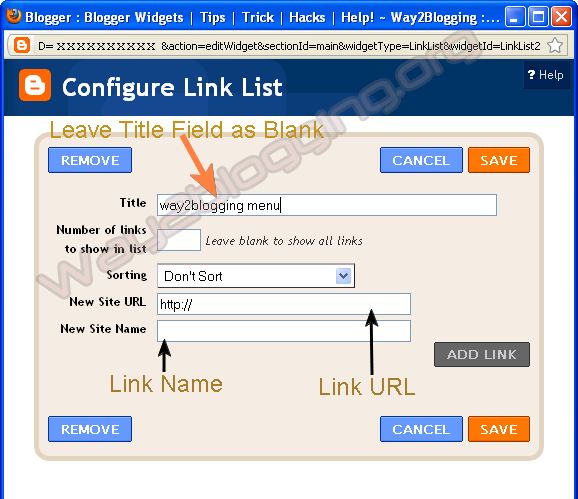
3. Choose LinkList Gadget and Leave Title Field as Blank
4. Try to Add Some Links and Save Gadget


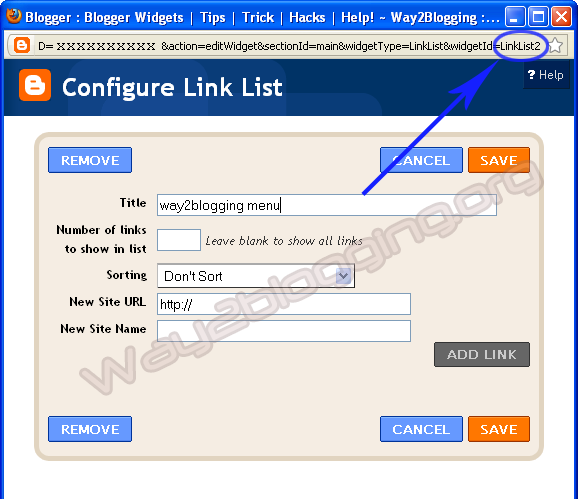
5. Edit LinkList Widget Once again, And Copy Widget ID From URL like in Image

Make Sure the ID may Exact to match in the URL even a Block Letters(Capital Letters) Also for Perfect Working of This Widget!


http://www.blogger.com/rearrange?blogID=xxxxxx&action=editWidget&
sectionId=xxxx&widgetType=LinkList&widgetId=LinkList2
Here is LinkList2 is the widget ID in this URL

6. Use the below Form and Generate your Widget Code then Paste it before </head> tag in your template.


7. Save your template, You are Done!.

Put your Comments and Feelings About this Method of installation and about this Widget, So that i can implement  more widgets and menu's through this way! and also, share this Article with your Friends or to your Network :).

How To Add Blogger Popular Posts Widget With Zoom Effect / Using CSS


1.Login to your blogger dashboard--> Desing- -> Edit HTML
2.Scroll down to where you see ]]></b:skin> tag .

3.Copy below code and paste it just After ]]></b:skin> tag


<style type='text/css'>
.PopularPosts .item-title{display:none}
.PopularPosts .widget-content ul li{background:none repeat scroll 0 0 transparent; float:left; list-style:none outside none; margin:10px 0 0 !important; padding:0 !important}
.PopularPosts .item-thumbnail{margin:0 8px !important}
.item-thumbnail img{-moz-border-radius:10px; -webkit-border-radius:10px; border-radius:10px; -webkit-transition:all 0.5s ease; -moz-transition:all 0.5s ease; transition:all 0.5s ease; border:5px solid #666; height:40px; padding:3px; width:40px}
.item-thumbnail img:hover{border:5px solid #BBB; -moz-transform:scale(1.3) rotate(-5deg); -webkit-transform:scale(1.3) rotate(-5deg); -o-transform:scale(1.3) rotate(-5deg); -ms-transform:scale(1.3) rotate(-5deg); transform:scale(1.3) rotate(-5deg)}
</style>

Note: Please You first Add Popular Posts widget to Your Blogger Sidebar. (Blogger widgets list..)

4 Now Click on Save Template and You are Done..

Cheers.

How To Add Cool Floating Facebook Like and Stumble Upon Retweet Counters to Your Blogger


1.Login to your Bogger Dashboard and go to Desing >> & Page Elements.

2.Click on 'Add a Gadget' on the sidebar.

3.Select 'HTML/Javascript' and add the one of code given below


<div style="display:scroll; position:fixed; top:40%; left:2%; border: 1px dotted #E8E8E8; padding:0px 0px 0px  5px; height:220px; width:53px "> 
    <table cellpadding="1px" cellspacing="0"> 
    <tr> 
    <td style="border-bottom: 1px solid #E8E8E8; padding:5px 0 2px 0;"> 
    <iframe src="http://www.facebook.com/plugins/like.php?href=&quot; + data:post.url + &quot;&amp;layout=box_count&amp;show_faces=true&amp;width=50&amp; action=like&amp;font&amp;colorscheme=light&amp;height=65" scrolling="no" frameborder="0" style="border:none; overflow:hidden; width:50px; height:65px;" allowtransparency="true"></iframe> 
    </td> 
    </tr>
    <tr> 
    <td style="border-bottom: 1px solid #E8E8E8; padding:5px 0px;"> 
    <script src="http://www.stumbleupon.com/hostedbadge.php?s=5"></script> 
    </td> 
    </tr>
    <tr> 
    <td style="border-bottom: 0px solid #E8E8E8; padding:5px 0 0px 0;">
<a href="http://twitter.com/share" class="twitter-share-button" data-count="vertical" data-via="hackerclub4u">Tweet</a><script type="text/javascript" src="http://platform.twitter.com/widgets.js"></script> 
    </td> 
    </tr>
    </table> 
    </div>;


Note: Replace hackerclub4u with your twetter account name

4. Now Click on Save "Html Java Script" and You are done..

Cheers

Add Animated Flying Twitter Bird Widget to Blogger Blogs (Updated)

Flying Twitter Bird widgets for blogger, in my previous post i give this awesome widget and i am getting spectacular response from you. previously, the twitter bird has two types based on tweet text.
one is unique tweet text that you choose like "Blogger Widgets and Tricks - http://www.thehackerclub.blogspot.com" for all pages
and Second one is tweet text contains post title and post url, just like "How To Add Animated Flying Twitter Bird Widget For Blogger / Blogspot - http://thehacke3rclub.blogspot.com

Now i am giving another type, that is tweet text contains Current page title and Url, and is visible in all pages of your blog, for suppose you are in label page then the tweet text contains Label Name and URL


How to Install?
is Very Simple! just follow these steps...

  1. Change Your Twitter Account User Name.
  2. Copy The Bellow Widget Code.
  3. Go to Blogger Dashboard > Design > Edit HTML .
  4. Search For </body>tag and Place Widget Code Just Before it.
  5. Save your template.


<!-- Twitter Bird Widget for Blogger by Way2blogging.org -->
<script type="text/javascript" src="http://bloggerblogwidgets.googlecode.com/files/way2blogging.org-tripleflap.js">
</script>
<script type="text/javascript">
 var twitterAccount = "hackerclub4u";
 var tweetThisText = " <data:blog.pageTitle/> : <data:blog.url/> ";
 tripleflapInit();
</script>
<span style="font-size:11px;position:absolute;"><a title='Blogger Widget by Way2blogging.Org' href="http://www.way2blogging.org" target='_blank'>Blogger Widgets</a></span>
<!-- Twitter Bird Widget for Blogger by Way2blogging.org -->
NOTE=Replace hackerclub4u with your own twitter username
That's All!

How to Add a Falling Snow Effect To Blogger V4

1.Login to your blogger Dashboard and go to Desing --> Page Elements.

2.Click on 'Add a Gadget' on the sidebar.

3.Select 'HTML/Javascript' and add the one of code given below


<script src="http://thehackerclub.blogspot.googlecode.com/files/www.thehackerclub.blogspot.com-snow.txt" type="text/javascript">
/***********************************************
* Snow Effect without images-by Kurt Grigg at http://www.btinternet.com/~kurt.grigg/javascript
* Script featured available at Dynamic Drive at http://www.dynamicdrive.com/
* By THC (http://www.thehackerclub.blogspot.com)
* Please keep this notice intact
***********************************************/
</script>

4. Now Click On Save 'JavaScript' You are done.

How To Add Funny Dancing Twitter Flash Bird On Your Blog And Sites

How To Add Funny Dancing Flash Twitter Bird to Your Blog


1.Login to your Bogger Dashboard and go to Desing >> & Page Elements.

2.Click on 'Add a Gadget' on the sidebar.

3.Select 'HTML/Javascript' and add the one of code given below


<object type="application/x-shockwave-flash" data="http://www.buzzbuttons.com/BUTTON8/twitbutton.swf" width="200" height="200"><param name="movie" value="http://www.buzzbuttons.com/BUTTON8/twitbutton.swf"></param><param name="allowscriptaccess" value="always"></param><param name="menu" value="false"></param><param name="wmode" value="transparent"></param><param name="flashvars" value="username=bloggertoolz"></param><a href="http://www.dreambingo.co.uk/" title="http://www.dreambingo.co.uk/">http://www.dreambingo.co.uk/</a><embed src="http://www.buzzbuttons.com/BUTTON8/twitbutton.swf" type="application/x-shockwave-flash" allowscriptaccess="always" width="200" height="200" menu="false" wmode="transparent" flashvars="username=hackerclub4u"></embed></object>

Note: Replace hackerclub4u with your twetter account name

4. Now Click on Save "Html Java Script" and You are done..

Cheers

HOW TO: Add social networking buttons

This weeks blog how to is answering the following question that Shayna sent in: 


"I love how you have your facebook, twitter, email, and feeder buttons to follow you using pictures and it opens to the link, could you share how you accomplished that?"
 
Shayna also wanted to have them in a square, as I have done with the buttons on Someday Crafts, so I am going show you how to add the buttons linked to your social networking sites and then also how to arrange them into a square.
 
Here we go:
First off you will need to search for the icon that you need (easiest way is via Google Image Search), or you can right click the buttons below that you need and save them to your desktop, make sure to name them so you can recognize them (which is important later down the road, so for the ones below I have them named, FEED, FACEBOOK, TWITTER, MAIL_ICON).

These icons have been sized to 52 px x 52 px which is a good size for your sidebar, you can resize images in most photo editing software.

To add these to your sidebar:
First create a post as usual.  Click the Insert Image button.

In the pop-up window click Browse and locate the images on your desktop, click open and then insert them into your post.
Next you will want to right click on the Layout tab and click open in new tab (or new window if you have an older Internet Browser).
Go to that tab.  Click Add a Gadget in your sidebar.
In the pop-up window, select HTML/Javascript.

In the Configure HTML/JavaScript box, type in your Title (I used "I'm Social!") and then you will need to type this code for each image, so if you have four images, paste it four times and replace with your info:
Where do you get your Website URL?  Go to your Facebook page or other site (make sure you are logged out), select the address in the address bar and paste into the code.  If you are trying to find your Feedburner address, go to your account, you should be able to find it in there (it will start with: http://feeds.feedburner.com/ - mine is http://feeds.feedburner.com/733blog).

Where do you get your image URL? Go back to your other tab where we inserted the images.  Click on Edit HTML.
Don't get overwhelmed.  You will see a bunch of gobbly-gook.  You need to look for the image sources (if you have 4 images, there will be 4 image sources).

The easiest way to do this is to hit CTRL-F.  In the Find box type in src= and click next.  You want to select the info between the quotation marks after src=, now copy and paste it into the correct source spot in your Configure HTML/Layout Box.  If you have another image, click next on your Find box.  Continue doing this until you have all of your image URL's.  You can now close out your Post tab (don't hit Publish Post, just X out the tab - you don't even need to save the post if you are confident you did this right).

This is how it will look:
If you are OK with the images being in a row, you are done!

If you have 4 images and want them in a square shape as Shayna has requested, continue reading:
Open your html/javascript box.
Click on Rich Text.
It will look like this (I somehow managed to forget to put a space between the mail button and the feed button in this screenshot. If you want spaces between your icons, place your cursor between any two icons, click and hit the space bar).
Insert your cursor between the Facebook button and the Mail button and hit Enter.
Now it looks like this (notice the missing space between the mail and feed icon?):
Hit Save and you are done!
 Here is how it will look:
NOW YOU'RE DONE!

I hope this isn't too confusing.  Please feel free to ask questions.  OR, if you want me to do this for you, just send an email to 733blog (at) gmail.com.  For $15 I'll get it done!

I sent these directions to Shayna to give them a try and make sure they were clear and here was her response:

"I did it!!!!!!!!!!!!!!!!! OMG thank you so much, I'm still tweaking with the colors and pics I want to use but I have it done for now..."


HOW TO: Add sponsors buttons to your blog


I've had several people question how to add a sponsors button when the sponsor does not send html code, just the image.
 
Good news: it is super easy! {I always say that, don't I?  I can't help it! It's true.}
 
First, save the sponsors button to your computer desktop with an easily recognizable name - i.e. use the shop or blog name. 
 
Create a post as usual. Click the Insert Image button.


In the pop-up window, click Browse and locate the image on your desktop, click open and then insert it into your post.


Next you will want to right click on the Layout tab and click open in new tab (or new window if you have an older Internet Browser).
Go to that tab. Click Add a Gadget in your sidebar.
In the pop-up window, select HTML/Javascript.
In the Configure HTML/JavaScript box, type in your Title (something like "These Sponsors are Amazing") and then you will need to type this code for each image, so if you have four sponsor images, paste it four times and replace with your info:
Where do you get the Sponsor Website URL? Simply type in the address of the Etsy shop or blog that should open when the button is clicked.

Where do you get your image URL? Go back to your other tab where we inserted the images. Click on Edit HTML.
Don't get overwhelmed. You will see a bunch of gobbly-gook. You need to look for the image source(s) (if you have 2 images, there will be 2 image sources).
The easiest way to do this is to hit CTRL-F. In the Find box type in src= and click next. You want to select the info between the quotation marks after src=, now copy and paste it into the correct source spot in your Configure HTML/Layout Box. If you have another image, click next on your Find box.

You can now close out your Post tab (don't hit Publish Post, just X out the tab - you don't even need to save the post if you are confident you did this right).

Save your gadget and you are done.

What if you want to add another sponsor, but don't want a new gadget?  That is fine (and easier then having 20 sponsor gadgets!).  Just open up our sponsor gadget and paste in the html code with a space or break in between the first and second code. You can add as many buttons to the one gadget as you want!
If you have any questions, feel free to leave me a comment.

Recommend us on Google!

Share

Twitter Delicious Facebook Digg Stumbleupon Favorites More