Welcome To The Hacker Club 4U

On This Blog Now You can get knowledge about how to to do hacking and also Know how to prevent from hacking and know many tips And tricks of computer and internet

Hacking

Click Here To Know Many Tricks and Tips Of HACKING facebook,twitter and other accounts and passwords

Hacking Safety And Security

Click Here to know how to protect your computer and inetrnet from hacking and know hacking safety and security tips and tricks

Facebook And Twitter

Click On Picture For TWITTER And Click On This Tittle For FACEBOOK .Hacking And Security Tips Of facebook and twitter.Know how to byepass facebook login and twitter login

Gmail And Yahoo

Click On Above Picture For GMAIL Hacking And Security Tips . And.Click On This Title For YAHOO Hacking and security tips


Showing posts with label Hide Text in photo(stegnography). Show all posts

How To Protect Images From Being Copied / Downloaded

In this post, I'll discuss some ways to protect images from being copied on the webpages. You spend a lot of time and hard effort to creating unique images for your website, and later other could download them, which is not fair. Do you want to protect your images from being copied? If yes, you are here at the right place. In normal speak, you can not protect your images 100% from being downloaded because a webmaster or any person who knows some coding, may steal your images from your websites. Therefore, if you want 100% protection of your images from being copied, I would suggest you to use your watermark or your name on your images with transparency or don't put it on the internet (joke!). However, you can protect your images from being copied by the persons who are not webmasters.


protect image from being copied or downloaded
Protect Images from being copied or Download

If you Google it "how to protect images from being copied". You'll across with a technique which shared the most on the web by disabled to right click on the WebPages, but I think disabled to right click is not a good idea. Most of the users visit your webpages for information purpose only and very small no. of visitors visit your website for stealing your images so most of peoples feel insulting if you disabled right click on webpages and also it will not give you a professional work. Although, you can disable right click only on the images of your web pages not overall part of your web pages as on the part of your content and your links, but if you disable right click, users may drag and drop images from your webpages to their desktop.
We will discuss some techniques for protect your images from being downloaded as follows,

  1. Protect Images From Being Copied By 'img' Tag.

  2. Protect Images From Being Copied By 'table' tag.

  3. Protect Images Form Being Copied By Disable Right Click Only On Images.


I like the above first and second methods for protection of images in web pages. If you apply first or second method to protect your images from being copied and an image theft comes up on your website, and drag and drop your images to his/her desktop. They will shock and think what it is because they would not get any image to desktop after dragging or after to select the save as option. Let us first in very short description I tell you that what I would try to apply here.

"Firstly, takes an image which would you like to prevent from being copied and note down its width and height, and now create a transparent image of the same width and height as your main image. Now, upload your main image to your post, and then upload your transparent image adjacent to your main image. Now, we will try to move up your transparent image onto the main image. If succeed, everyone can see the main image because the upper layer on the main image is transparent, but if someone drags and drop your images from your web to their desktop, then always your transparent image will move on and your theft shocked each time. That's it!"

Updated: Please read the above message first which is in the quote.

If you want to protect all images on your website, then creating different transparent images for each image is waste of time. Now, we'll create only one transparent image of width and height each 1px, which will save image size too. We will use this transparent image with every image of our websites because we can change our transparent image's width and height via inline style, and all the procedure is same as we mentioned in above quote. Now we start the process.

How To Protect Images From Being Copied / Downloaded By img Tag


If you don't know that how to create the transparent image then simply you can download this transparent image of width 1px and height 1px by clicking on Transparent Image (wait 5 second and click on Skip Ad at the top of the right side). Save this image to the desktop, and upload it into your blog, or you can use free image hosting sites as imageshack.us and grab the direct link to use the image into your blog. You can also host your images into your blogger for free with unlimited bandwidth, to know more about it click on upload high quality images to Blogger.
Now look at the following code.
( Let we use here main image of 200px and height 200px. You may use different size of your image. )

***Here we are using border on the transparent image for better explanation because we could not be able to show you the location of transparent image without borders.
--> Border of Transparent image = Black;

<div style="float: left;">
<img src="https://blogger.googleusercontent.com/img/b/R29vZ2xl/AVvXsEih68peQOY9C_smziNtkxkxWVA_BjGAVDmQNqev9jhJYbEhcWGIWRSJEJLSyviA6euXrUeYwlYdaS_kn3mD64vWO-eQ17t3HVEw2HD_VgkGuPmmign8lMRCLQADuMZi01YWTsu_niK87Iz_/s1600/how+to+protect+images+in+websites.png" style="width: 200px;height: 200px;"/><img src="http://img836.imageshack.us/img836/5371/protection.png" style="border: 1px solid #000; width: 200px; height: 200px; " /></div>
Code 1.0

*** Please read carefully this step: In the above code, we have included two img tags as <img/><img/>. first one is for your main image and second one is for your transparent image, and make sure don't have no space both between both img tags( as <img/>SPACE<img/>) or no enter key ( as <img/>LineBreak<img/> ). Otherwise, these images will not be adjacent and this technique will not work.

*** Make sure in both img tags the height and width must be same or you can increase the width and height of the transparent image section but your main image's height and width must not be less than transparent image size. Otherwise, transparent image could not properly move up on the main image.

*** If you want to add border on main image then simply add the code for adding the border as we created in the transparent image i.e., border: 1px solid #000;

*** You can see in the second img tag we did expand 1x1 px image to 200x200 px image by adding width and height attribute in to the inline style sheet in transparent image.


The Preview of the above code will be as follow,


Now we will try to shift a transparent image hover to the main image by applying margin property on to the  transparent image and also make sure that the layer of your transparent image must be outer than the layer of the main image. It means that we have to use negative margin property on the transparent image. Since, our transparent image is in the right position of the main image. Now, we will try to shift our transparent image from right to left by using negative margin-left property, such as [ margin-left: -(width of main image)px; ], into the inline style sheet of transparent image. Let's adding this attribute into the above code 1.0.

*** Here the width of main image is 200px so we will use margin-left: -200px;
*** If you use the border for your main image then you must be set margin-left: -(width of main image + width of right border of main image + width of left border of main image); , let us we use "border: 1px solid #000;" into the main image, then this border width also includes into the width of main image so 1 px increases by left border and 1px increases due to right border of the main image, so we have to set margin-left: -202px;

so the above code will be changed to,

Code 1.1
<div style="float: left;">
<img src="https://blogger.googleusercontent.com/img/b/R29vZ2xl/AVvXsEih68peQOY9C_smziNtkxkxWVA_BjGAVDmQNqev9jhJYbEhcWGIWRSJEJLSyviA6euXrUeYwlYdaS_kn3mD64vWO-eQ17t3HVEw2HD_VgkGuPmmign8lMRCLQADuMZi01YWTsu_niK87Iz_/s1600/how+to+protect+images+in+websites.png" style="width: 200px;height: 200px;"/><img src="http://img836.imageshack.us/img836/5371/protection.png" style="border: 1px solid #000; width: 200px; height: 200px; margin-left: -200px; " /></div>

let's see the preview,


Sound like good. Your transparent image has completely moved up onto the main image. Can you steal this image? Try it by drag and drop to your desktop or right click on the image and save it to your desktop. What will you get? I think the transparent image only. :)

If you want to add this image to the right side, then simply change"float:left;" to"float: right;" into the above code.

if you want to add this image to the center of your post, then change "float: left;" to "text-align: center;" into the above code. That's it!

*** Where could you paste these codes, please see the instruction of bottom of this post.

*** Basically the position for your images is floated, so if your image is in float left, then your content will be in the right side, the exact example is on the above image (image in left and content in right). In this case you have to need some space between your content and image so replace the following code <div style="float: left;">  in Code 1.1  by <div style="float: left; margin:5px;"> .

*** If you don't wish to write adjacent to the right or left image, then simply add the following code just after the Code 1.1
<div style="clear:both;"></div>

You done!

How To Protect Images From Being Downloaded / Copied By Table Tag


Now, here we will protect images from being copied by using table tag, and make sure to note down the width and height of the main image it's property. I will suggest you to use the above first method for protecting your images. Since, it is also a possible solution for protecting your images from being downloaded so I am also considering this case. If you have a little knowledge about HTML table tag, then you could easily understand what I want to explain so let's with a very short description take a look at this method.
"Firstly, we will create a table and in that table, we will create a row, and then in that row we will create a column (now the game start!). In that column, we will upload my main image as a background image, and then we will insert a value in that column as my transparent image, which will cover the background image and ... and what? End the process. That's it!"
Now look at the follow code,

*** Now, we will not use the border of transparent image. I think you will have familiar with.
*** Since, here we will show the transparent image to its original background, so don't need to margin or padding here.
*** Here, my main image width=249px and height=200px, so we will make the same size of transparent image.

Code 2.1

<table>
<tr>
<td style=" background: url(https://blogger.googleusercontent.com/img/b/R29vZ2xl/AVvXsEih68peQOY9C_smziNtkxkxWVA_BjGAVDmQNqev9jhJYbEhcWGIWRSJEJLSyviA6euXrUeYwlYdaS_kn3mD64vWO-eQ17t3HVEw2HD_VgkGuPmmign8lMRCLQADuMZi01YWTsu_niK87Iz_/s1600/how+to+protect+images+in+websites.png) no-repeat;"><img src="http://img836.imageshack.us/img836/5371/protection.png" style="height: 220px; width: 249px;"/>
</td>
</tr>
</table>

Below is the preview of the above code,
*** Please make sure, there must not be any space between <td><img/> tag.


***Now, let's about the positions of your images into your post, such as left, right or center including the adjacent content to your images or not. We have created a simple table for your need. Take a look,
Want\Do Position What have you to
replace in Code 2.1
from which have
you to replace
Image with adjacent
content
Left <table> <table style="float: left;">
Right <table> <table style="float: right;">
Image without adjacent
content
Left <table> <table style="text-align: left;">
Right <table> <table style="text-align: right;">
Image Center <table> <table style="margin-left:auto; margin-right:auto;">

You done!

Now the third method that is how to protect images from being copied by disable right click only on images on your web pages. We will create a new post for it, because this post has already been lengthy. The second factor is that I am in very sleepy mood, and the light rays of the sun are knocking my door ( LOL).

Where can you paste these codes:

You can paste these codes to anywhere, where HTML allowed. Check out the following steps,

  • In Blogger Post: Sign in to Your Blogger Dashboard -->click on How to protect images from being downloaded Create new post --> select HTML mode and paste the above code.
  • In Blogger Sidebars: Go to Blogger Dashboard --> Layout(Under more options) --> Add a Gadget(choose from sidebars) --> HTML/Javascript(Choose under pop up window) and paste your code and click on Save.

Hope! You enjoy this tutorial and if you have any doubt, then can feel free to ask me via comments.

IF THIS TRICK IS HELPFUL FOR YOU THAN
PLEASE DON'T FORGET TO CLICK ON SUBSCRIBE BUTTON.........!

How To Hide Yourself From being Traced


NOTE : STRICTLY FOR EDUCATIONAL PURPOSE ONLY.

Now you all thinking why I am saying this.. Itz pity simple because Its the most dangerous part i.e Hiding your identity from being traced by anyone i.e government,ISP,Raw...everything... So Read On...

Let's have a Breif Look up of Topics That we Cover Here:

1. Proxies and Anonymous Web Browsers
2. Anonymizers
3. Tools to bypass Government Censorship
4. Tools to Bypass Google Tracing
5. HTTP Tunneling for Windows
6. IP spoofing

WHAT IS PROXY AND HOW IT WORKS???


Proxy is a network computer that can serve as an intermediate for connection with other computers .


They are usually used for the following purposes:
• As a firewall, a proxy protects thelocal network from outside access.
• As an IP addresses multiplexer, a proxy allows the connection of a number of computers to the Internet
   when having only one IP address.
• Proxy servers can be used (to some extent) to anonymize web surfing.
• Specialized proxy servers can filter out unwanted content, such as ads or 'unsuitable' material.
• Proxy servers can afford some protection against hacking attacks. (For Our Purpose)

HOW AND WHY TO GET FREE PROXY SERVERS ??

~ Attacks using thousands of proxy servers around the world are difficult to trace.
~ Thousands of free proxy servers are available on the Internet .
~ Search for “free proxy  servers” in Google .
~ Using proxy servers can mask your trace .


I will recommend two sites for getting the Free Proxy servers. As these sites Daily provides Fresh anonymous Proxies...

1. http://www.tech-faq.com/proxy.shtml  (provides almost all type of Proxies)


2. http://proxy.org/   (check the Right Hand Side For Proxies)

BELOW SNAP SHOWING HOW PROXIES USED TO ATTACK..

ANONYMOUS WEB BROWSERS

Anonymous Web Browsers have inbuilt proxy finders they search for proxies by default and make our surfing anonymous...
TWO BEST ANONYMOUS WEB BROWSERS ARE:


1. Invisible Browsing

2. BrowZar

ANONYMIZERS

Anonymizers are services that help to make web surfing anonymous. The first anonymizer developed was Anonymizer.com, created in 1997 by Lance Cottrel.

An anonymizer removes all the identifying information from a user’s computers while the user surfs the Internet, thereby ensuring the privacy of the user.

Why We Use Anonymizer?
• Example: Google.com keeps track of all your web searches on their servers by placing a cookie on your machine.
• Every single search you entered at Google is logged.

SEVERAL ANONYMIZER TOOLS ARE:
1. Hide Platinum IP (Download)
2. Super Hide IP (Download)

Creating Simple Page Turn Animation In Maya

If you want to have a page turn animation of thick pages then it is a lot easier. But if you are thinking about the thin pages turning animation then you’ll need different method to do that.
We’ll be introducing with bones that works exactly as a human bone.
Let’s begin with the tutorial.
Create a polygon plane or NURBS plane.

Resize it to give it a shape of a single page sheet. Now move the left end of the page to the centre of the grid. To do this, hold down D and V together and click and drag red pivot (x-axis) towards the end line of the left side of page.

Now release the D and V and again hold X and drag it towards the centre of the grid.

After you are done placing, your work will look like the image above. Now increase the subdivisions along both axes.

Now go to the attributes and create a new empty layer. If you got confused to create a new layer. Click on the attributes editor.


After the new layer has been added, in default it will be named as layer1.
Now select the page sheet model and left click on layer1. After layer1 is highlighted, hold down right click and select Add selected objects.

Now to make the object non-movable but transparent, give a single click on the blank box at the right side of ‘V’ in the layer (V is for the visibility of the layer). It will show ‘T’ (T is for the transparency).

Now the page sheet is ready. Next, we are going to add bones to the page sheet.
Press F2 or select Animation from the Status Line bar.

On the menu bar go to Skeleton > Joint Tool.

Your cursor will change in to ‘Plus’ sign if you drag it to the perspective screen.
Now create and arrange joints similar to the image below.

Please note that the joint begins from the left part of the page. Hold down X to place the first and second bone. Also remember that, the first and second bone must be arranged in a same axis (in this case it is X- axis were Y will be 0 for both first and second bones).

In the time line slider change the frame visibility limit to 100, as shown in the figure.

Remove the transparency of the layer1 by clicking T twice (not double clicking, it will show blank if the transparency and locking is removed).
First select the page sheet and then Shift select joint1. Then bind the skin from the skin menu.(Refer to the image below)

Now rigging part of the page is done.
Lets animate it.
Select the first joint (joint1) and select the first frame and press on ‘S’ button to set the key frame where all the scale, translate and rotate value is 0.
Again with joint1 selected, go to 100 frame and change the rotate Z value to 180 and press S again.
Now our job will only be to set the keys.
Therefore refer to the following table.
Joint name Frame number Rotation Z
Joint1 1 0
Joint1 100 180
Joint2 45 17
Joint3 40 17
Joint4 35 17
Joint5 30 30
Joint6 Joint6 25 65 30 7
Joint7 Joint7 20 80 25 -4
Joint8 15 20
Joint9 10 15
Press “S” button every time after setting the Rotate Z value.
When you animate it, you won’t be satisfied because of the page left edges moving along with the bone (the left part of the page is fixed on the book binding). Therefore we’ll be needing a simple weight paint job.

Select the page sheet model.
Go to Skin>Edit smooth bind>Paint Skin weights tool> option box. (refer to the following image).

It will load the paint attributes on the right side bar.

Select joint1 as in above image, the page sheet will look similar to below.

Hold down B and left click and drag left or right to resize the brush.
Now paint the brush which will give similar look to the image below.

Select the desired function to add, remove, replace or smooth the paint.

After you are done painting, select smooth brush (refer to image above) and brush over it 3-4 times.
Now animate it. You’ll see the page turning smoothly without any error. To make it more natural apply paint tool to all the joints.
Hope this tutorial was much helpful for basic rigging and animation of a page sheet. You can further copy the page sheet to have multiple pages.

Upload Files To Bloggers

There are many inquiries regarding the types and sizes of files which you can upload to Blogger. There are some limits and I have tried to list all here......


TYPES OF FILES


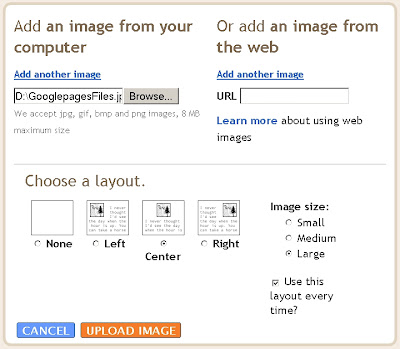
You can only upload image files to your Blogger blog. These can only be uploaded through your blog posts. To do this Login to Dashboard and click on "+New Post". The Post Editor will open. In the top frame of the Post Editor just mouseover all the icons. This will show the tooltips and click on the square bluish icon (Add Image). The upload Image dialog box opens. Click Browse under Add an image from your computer to choose the picture file on your PC. Click on file to highlight it and then click Open. You can also add an image from the web. Paste the URL of your image in the URL text box under "Or add an image from the web". Then choose the position you want the image to be in and the size of the image and click Upload. See Picture below


Click on picture to enlarge it.

SIZE OF FILES


There is a total limit of 300MB on the pictures you are uploading through Blogger, Picasa, or Hello to a free BlogSpot blog. If it is a ftp blog then it is space on your server you should take into account. If you are posting pictures through Blogger Mobile there is a limit of 250K per picture. However there is no way to know whether this limit is approached until you break through it.

Individual pages of your blog are limited to 1MB size. Your main page may run into this limit so limit the number of posts on main page by going to Settings----->Formatting----->Show 4 posts on Main Page----->Save Settings. This will also speed up the loading of your blog.

There is no limit to number of blogs you have or number of posts you can make. Also there is no limit to number of comments. Individual posts do not have limit but may be limited by page-size as described above.


FREE HOSTING


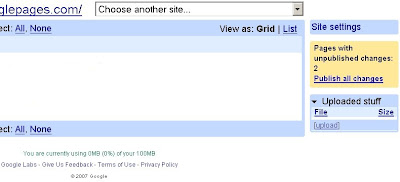
To overcome the size and file-type limit in your free blog try uploading your pictures to a freehostlike Googlepages. You can create 5 sites in Googlepages with each site having free 100 MB space to host files. To upload create a Googlespace account and click on Upload in bottom frame of sidebar. See picture below :


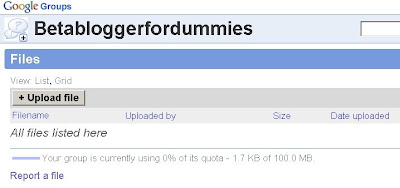
If you cannot create a Googlepages account create a Google Group of your own. You can upload 100 MB of total files here also. Click on "Files" after clicking on Manage Group. Then click on Upload File button. See Picture below:


Thus you can upload image, PDF, MP3, WAV, DOC, TXT and any other files to these freehosts. You can also upload image files to other freehosts like Flickr, Photobucket, Imagehosting etc. To upload files to Flickr see Youtube and Flickr. After uploading the files place your mouse cursor over the filename and right-click and choose Copy Link Location. This copies the location/URL/link of your file at the freehost. Then paste it into this code in your blog :

<a href="LINK OF YOUR FILE AT FREE HOST">DOWNLOAD FILE</a>

When viewers click on "DOWNLOAD FILE" they will get a dialog box prompting the to download your file. In this manner you can also create an image link as described in Making Image Link.

How to Create Animated Cinemagraphs

Cinemagraphs are a really compelling take on the traditional animated GIF, only showing motion in a portion of the frame to focus on a specific movement. This results in a very compelling looped animation and we're going to show you how to make one right now.

How to Create Animated CinemagraphsTo give credit where credit is due, the cinemagraph began with Jamie Beck and Kevin Burg on their tumblog From Me to You. (More on the history of Cinemagraphs here.) They've created some pretty amazing stuff, like the example on the left, so be sure to check out their work for inspiration.
How to Create Animated CinemagraphsOur example isn't quite so elegant. (You can see it to the right.) As an example, I put together an (imperfect) cinemgraph that makes it look like I'm digging around in my nose for, let's say, buried treasure. In this post I'm going to show you how I made it so you can make your own, perhaps more tasteful, cinemagraphs. This process is better demonstrated on video, so watch the one at the top of the page for an in-depth walkthrough. If you want step-by-step instructions in text form, read on.

Step One: Come Up with an Idea and Shoot a Short Movie Clip

How to Create Animated CinemagraphsTo get started, you're going to need a movie clip to work with. You want to choose something where the motion on display can be isolated nicely. Coffee stirring and nose picking are just two options. There are plenty of others. Just avoid getting too close to your subject as you want the surrounding areas to be entirely still.
Once you know what you're going to do, record a short movie clip. Start with something very simple, as the longer the clip is the more frames you'll have to pull. 20-30 frames can be fairly time consuming, as you have to isolate the moving area in every single one, so be careful about being too ambitious. Creating a cinemagraph can be very time consuming, so limit the frames you need as best you can.
When you're done shooting your clip, transfer it over to your computer. It's time to get to work.

Step Two: Create Your Frames in Photoshop

Photoshop can open movie files, so just drag your clip onto the app and you'll see the first frame like it's a standard still image. (Note: Photoshop can't read every type of file, so convert to an MP4 if you're having trouble with formats.) There are a lot of ways to move the frames you want to use into a new Photoshop document, but I like to copy them individually because I can skip certain frames that are unnecessary and choose exactly where I want to start and end in the clip. If you prefer another method, go right ahead. To start copying frames, go to the Window menu and open the animation panel. Scroll to the first frame you want to use in your movie clip, select all (Command/Control+A), and copy. Now paste that frame into a new layer in a new Photoshop document. You want to keep doing this for all the frames you're going to use. When you're done, you can close the movie clip and focus on the new Photoshop document.

Step Three: Isolate the Motion in Every Frame

How to Create Animated CinemagraphsThis part of the process is the most time-consuming. Basically, you need to erase the parts of each frame that you don't want to move. I like to do this by selecting the relevant, moving part with the polygonal lasso, inverting my selection (Command/Control+Shift+I), and refining the edge of that selection (Command/Control+Option/Alt+R) to increase the feather size so the edges are nice and soft. (You can also have a built-in feather by adjusting the settings of the polygonal lasso if you prefer.) Once you've done all that, just press the Delete key to remove the parts you don't need. Now repeat this for every frame.

Step Four: Tell Photoshop How You Want Your Animation to Play

How to Create Animated CinemagraphsCreating the animation is pretty easy because you've basically done that already. You just need to go into the Animation panel you opened earlier and start by clicking the Frame Mode button. It's the one all the way in the bottom right corner. When you do that you should just have one frame. Make sure it looks like the starting point—meaning the only layer that's showing in your layers panel is the first frame—and then go ahead and click the "Duplicate Frame" button. (It's the one that looks like a little page icon and is to the left of the middle in the panel.) This will create a new frame based on the previous one, and you can go ahead and display the next frame in your animation. I did this by creating each frame in its own layer, then showing only the one that was supposed to be visible. (You can see this demonstrated in the video up at the top of the post.) You'll need to repeat this process for every frame. Just press the "Duplicate Frame" button, show the next frame, and keep repeating the process until every frame has been added.
At this point you're basically done with the animation, but you'll probably want to set the duration to something other than the default. Generally the default is 10 seconds, which is very slow. Generally you'll want to set it to "No Delay", but you can fool around with the options and decide what you want. To choose a duration, just select all the frames you want to change and click on the duration on the bottom of one of the frames. Choose what you want, or set a custom amount. You may want to adjust individual frames to last slightly longer than others. Go ahead and play around with your options until you get the motion you desire.

Step Five: Save for Web

Now all you have to do is save your image. Go to the File menu and choose "Save for Web & Devices". Be sure to choose GIF 128-bit Dithered as your preset and check the animation box in the bottom right corner of the screen (if it isn't checked already). You can make other alterations, but generally all you'll need to do here is save. Once you're done, that's it. You've created a cinemagraph. That's all there is to it! If you make your own cinemagraph, share it in the comments!

20 Facebook Tips/Tricks You Might Not Know

20 Facebook Tips/Tricks You Might Not Know


If you surf Facebook on daily basis or occasionally, chances are you’re already familiar with regular stuffs like add/delete friends, update statuses, walls and profile, add and explore pages & applications, etc, but there’s more..
This week we want to cover some interesting things you can do on (or with) Facebook; inclusive of tricks that are not documented or unknown to many, as well as tips to stay connected better with your friends. Without further ado, here’s 20 Facebook Tips/Tricks You Might Not Know. If you have interesting tips/tricks related to Facebook, please feel free to share in the comment box below.
How to Place Facebook Chat On Firefox SidebarIf you are using Firefox, you can place the Facebook Chat at the sidebar.

How to Download Facebook Photo Albums

FacePAD: Facebook Photo Album Downloader allows you to download your friends’ facebook albums, Events albums, and Group Albums, en masse, with the click of a button.


How to Share Flickr Photos to Facebook

Flickr2Facebook is an unofficial Flickr to Facebook uploader(bookmarklet) which allows you upload photos to Facebook from Flickr.


How to Update Facebook without Using Facebook

hellotxt and Ping.fm both introduced features that let Facebook administrators update Facebook Pages.


How to Schedule Facebook Messages

Sendible lets you schedule Facebook messages ahead of time so you can send messages to your friends, customers or colleagues in the future.


How to "Friend" Someone on Facebook & Hide It From Your Status Updates

A short tutorial on Makeuseof to guide you how to hide Facebook status updates and keep that fact confined to your closer friends.


How to Create a Photo Collage Using Pictures of Your Facebook Friends

Click on Friends tab. Proceed to More tab. From "Choose an option" dropdown, choose any of the dashes "" . Your Facebook friends collage is right on your computer screen.


How to Know When Facebook Friends Secretly Delete or Block You

This service has been discontinued. X-Friends is a unique tool for tracking friends that disappear from Facebook.


How to Display Selected Pictures Only on your Facebook Profile Page

A little-known feature in Facebook that lets you decide who shows up in that Friends box. Click that "edit" pencil in your Friends box and type the names of your best friends in the box that says "Always show these friends"


How to Remove Facebook Advertisements

This Greasemonkey script – Facebook: Cleaner removes many of the annoying ads and updates that unavoidably appear on your Facebook pages.


How to Syncs Photos of Facebook Friends with Contacts in Microsoft Outlook

OutSync is a free Windows application that syncs photos of your Facebook friends with matching contacts in Microsoft Outlook. It allows you to select which contacts are updated. So you can update all contacts at once or just a few at a time.


How to Display Facebook Statuses on Wordpress Blog

The following method make use of Facebook status feed and Wordpress RSS widget to display Facebook Statuses on WordPress blog.. It will also work for self-host Wordpress blogs.

How to Post Your Blog Posts to Your Facebook Wall Automatically

Wordbook allows you to cross-post your blog posts to your Facebook Wall. Your Facebook “Boxes” tab will show your most recent blog posts.


How to Access Facebook Chat on Desktop

Gabtastik and digsby let you keep Facebook chat sessions open on your Windows desktop outside of your regular web browser, using minimal screen real estate and system memory.


How to Create Quiz on Facebook Easily

LOLapps provides quiz creator that can be employed to conjure up these popular personality quizzes that are so widespread in Facebook.


How to Hide Your Online Status on Facebook Chat from Select Contacts

Facebook has integrated friends list with Chat and you can also choose which of these list members get to see you online.


How to Get Facebook Updates on Email

NutshellMail consolidates your Facebook accounts through the inbox you use the most.


How to Update Facebook Status from Firefox

FireStatus is a status update utility for multiple social networks, including FaceBook.


How to Get Facebook on Your Desktop

Seesmic DesktopFacebookerXobniFacebook Sidebar GadgetScrapboy and Facebook AIR application are desktop applications that allows you interact with your stream just as you would on Facebook, but without the browser.


How to Delete, Cancel and Terminate Facebook Account and Profile

A simple guide to terminate, delete or cancel Facebook account, together with the Facebook profile easily.


Nothing Else to Do..

Recommend us on Google!

Share

Twitter Delicious Facebook Digg Stumbleupon Favorites More