


Creating a simple webpage in HTML. Before you start coding, let me assume the following facts,
You know simple html tags like, HTML, BODY, TITLE, HEAD, TABLE, LISTS, etc. and some parameters like, WIDTH, HEIGHT, COLOR, BORDER, CELLSPACING, PADDING, etc.
Lets make a simple HTML page format as below:
To do so, we’ll be using TABLE, H1,H2, FONTS, HYPERLINKS, LISTS, HR etc.
Open up the notepad save it as “webpage.html” (with quotes)
And then create a table with similar format:
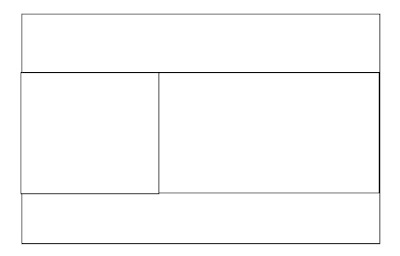
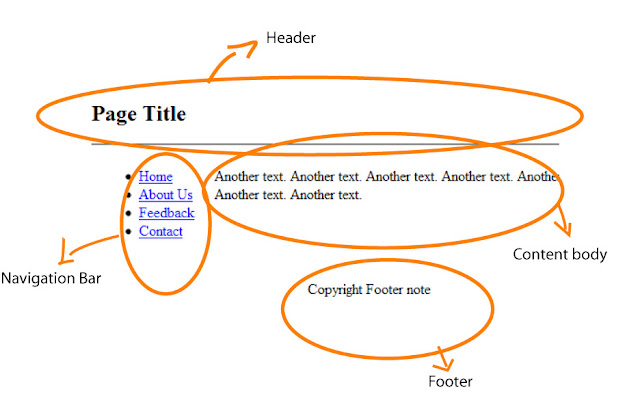
Your page will contain Page header, Navgation bar, Footer, Contents part.
To create a table similar to the format above, use the following tags.
For example:
Adding images and other hyperlinks.
After making simple page, you can add images, colored fonts, hyperlinks etc to make it more user friendly.
You can use <a href=”#”> and <img src=”#”/> tags to include hyper links and images.
See the example below(put it under the content body tag):
Similarly you can envelope text to create hyperlinks.
You can also change the size and font colors by applying the following syntax.
To create lists of texts or navigation,
Example:
After tweaking and playing with the tags you may get the good result.
For instance take the sample from below:
Hope this tutorial gave you some basic idea of designing webpage using notepad and HTML.
You know simple html tags like, HTML, BODY, TITLE, HEAD, TABLE, LISTS, etc. and some parameters like, WIDTH, HEIGHT, COLOR, BORDER, CELLSPACING, PADDING, etc.
Lets make a simple HTML page format as below:
To do so, we’ll be using TABLE, H1,H2, FONTS, HYPERLINKS, LISTS, HR etc.
Open up the notepad save it as “webpage.html” (with quotes)
And then create a table with similar format:
Your page will contain Page header, Navgation bar, Footer, Contents part.
To create a table similar to the format above, use the following tags.
<html>Now you have the basic layout ready. The things we need now is to fill the blank tables with appropriate contents.
<head>
<title>Page title</title></head>
<table width=”100%” cellpadding=”10″>
<tr width=”100% valign=”top”><h2> PAGE HEADER </h2>
<td width=”20%” valign=”top”>
NAVIGATION BAR
</td>
<td width=”80%” valign=”top”>
CONTENTS PART
</td>
<tr width=”100%” valign=”top”>FOOTER PART</tr>
</html>
For example:
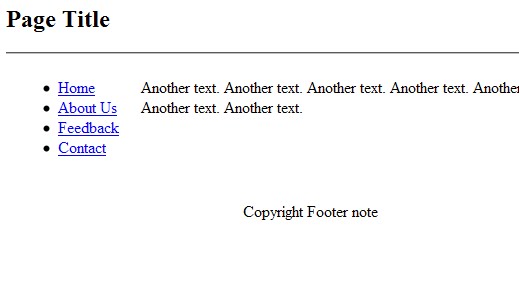
<html>The above code will give output in your browser as we’ve planned to (see the first image). Playing with the tags makes you further clear and adapted to web designing using HTML.
<body>
<table width=”100%” cellpadding=”10″>
<!– page title ->
<tr width=”100% valign=”top”><h2>Page Title</h2>
<!– end of page title ->
<hr>
</tr>
<tr>
<!– Navigation bar ->
<td width=”20%” valign=”top”>
<ul>
<li><a href=”#”>Home</a></li>
<li><a href=”#”>About Us</a></li>
<li><a href=”#”>Feedback</a></li>
<li><a href=”#”>Contact</a></li>
</ul>
</td>
<!– End of Navigation ->
<!– Body Contents ->
<td width=”80%” valign=”top”>
YOUR Contents goes here, type your text, insert hyperlinks, lists, images here to beautify your web page.
</td>
<!– End of contents ->
</tr>
</table>
<!– footer notes ->
<tr width=”100%” valign=”top”><p align=”center”>Copyright Footer note</P></tr>
<!– end of footer notes ->
</body>
</html>
Adding images and other hyperlinks.
After making simple page, you can add images, colored fonts, hyperlinks etc to make it more user friendly.
You can use <a href=”#”> and <img src=”#”/> tags to include hyper links and images.
See the example below(put it under the content body tag):
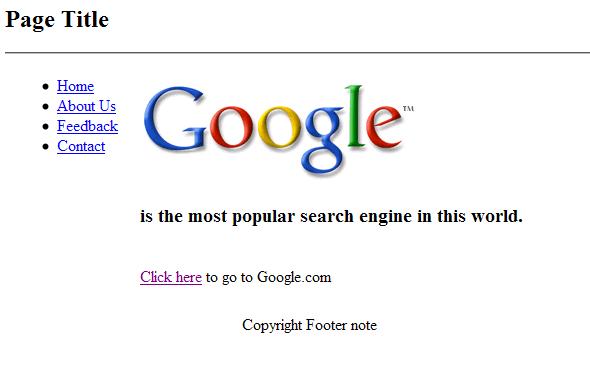
<a href=”http://www.google.com”>In the above example, Google’s logo image will be loaded using, <img> tag and that tag is enveloped under <a href> tag which enables the image to be clicked.
<img border=”0″ src=”http://www.google.com.np/intl/en_com/images/logo_plain.png”/>
</a>
<h3>is the most popular search engine in this world.</h3>
<br/>
<a href=”http://www.google.com”>Click here</a> to go to Google.com
Similarly you can envelope text to create hyperlinks.
You can also change the size and font colors by applying the following syntax.
<FONT COLOR=”color_name” size=”size_in_number”>FONT TO BE FORMATED</FONT>
To create lists of texts or navigation,
Example:
<ul><ul> tag creates a list block and <li> lists them in proper line break. In above example, we’ve listed the text with hyperlinks.
<li><a href=”#”>Home</a></li>
<li><a href=”#”>About Us</a></li>
<li><a href=”#”>Feedback</a></li>
<li><a href=”#”>Contact</a></li>
</ul>
After tweaking and playing with the tags you may get the good result.
For instance take the sample from below:
<html>It will show you the page like this:
<body>
<table width=”100%” cellpadding=”10″>
<!– page title ->
<tr width=”100% valign=”top”><h2>Page Title</h2>
<!– end of page title ->
<hr>
</tr>
<tr>
<!– Navigation bar ->
<td width=”20%” valign=”top”>
<ul>
<li><a href=”#”>Home</a></li>
<li><a href=”#”>About Us</a></li>
<li><a href=”#”>Feedback</a></li>
<li><a href=”#”>Contact</a></li>
</ul>
</td>
<!– End of Navigation ->
<!– Body Contents ->
<td width=”80%” valign=”top”>
<a href=”http://www.google.com”><img border=”0″ src=”http://www.google.com.np/intl/en_com/images/logo_plain.png”/></a><h3>
is the most popular search engine in this world.</h3>
<br/>
<a href=”http://www.google.com”>Click here</a> to go to <Font color=”green” size=“2”>Google.com</font>
</td>
<!– End of contents ->
</tr>
</table>
<!– footer notes ->
<tr width=”100%” valign=”top”><p align=”center”>Copyright Footer note</P></tr>
<!– end of footer notes ->
</body>
</html>
Hope this tutorial gave you some basic idea of designing webpage using notepad and HTML.


